
A product photo can look more professional and become less accurate at the same time. The interesting question is not simply whether AI can improve a picture. It is how much of the picture you should ask it to change.
We started with three edits of one glass bottle, then tested six more everyday subjects: jewelry, clothing, handmade pottery, a used camera, a bicycle and food. The results show where AI saves visual cleanup work and where a cleaner picture quietly changes the product.
Below are the actual first-pass outputs and exact prompts, followed by three framing tests that show what happens when the framing is too tight or parts of an object fall outside the photograph. The examples cover Etsy, eBay, Facebook Marketplace and small-business product photography.
The source photo and the experiment
The source is TwoScarsUp’s photograph of a Blenko 384 water bottle, released under CC0 on Wikimedia Commons. Its metadata identifies an iPhone 13 mini. The flowers, window trim and tabletop make it a useful everyday starting point, while the two pouring lips, circular depression, textured glass and small label give us details to compare.


We ran each prompt once on 10 November 2026 using OpenAI’s built-in image-generation editor, starting from the same source each time. We did not feed one result into the next, use a painted selection mask, or retouch the outputs afterward. These are three prompt directions, not three separate software modes. The bottle comparison isolates three approaches. The six additional examples each use one edit of a separate real photograph. Each example shows what changed in one edit, rather than how reliably the tool performs across many attempts.
The cover is an AI-generated editorial illustration; the images below are the actual test outputs.
Test 1: remove the distraction, keep the photograph
The brief: remove the flowers and leaves without changing the bottle, tabletop or lighting. This is the smallest useful intervention: the background competes less with the product, but the image still feels like the original photograph.
The prompt we used
Use case: precise-object-edit. Input image is the edit target. Make a minimal cleanup of this product photograph: remove the white flowers and green leaves behind the blue glass water bottle, continuing the existing pale wall and wood trim naturally. Keep the original wooden tabletop, camera position, crop, cobalt-blue glass bottle silhouette, double pouring spouts, circular indentation, glass ripples, reflections and small pink oval label unchanged. Do not relight, redesign, sharpen or beautify the bottle. This is a controlled product-photo fidelity experiment. No added text.
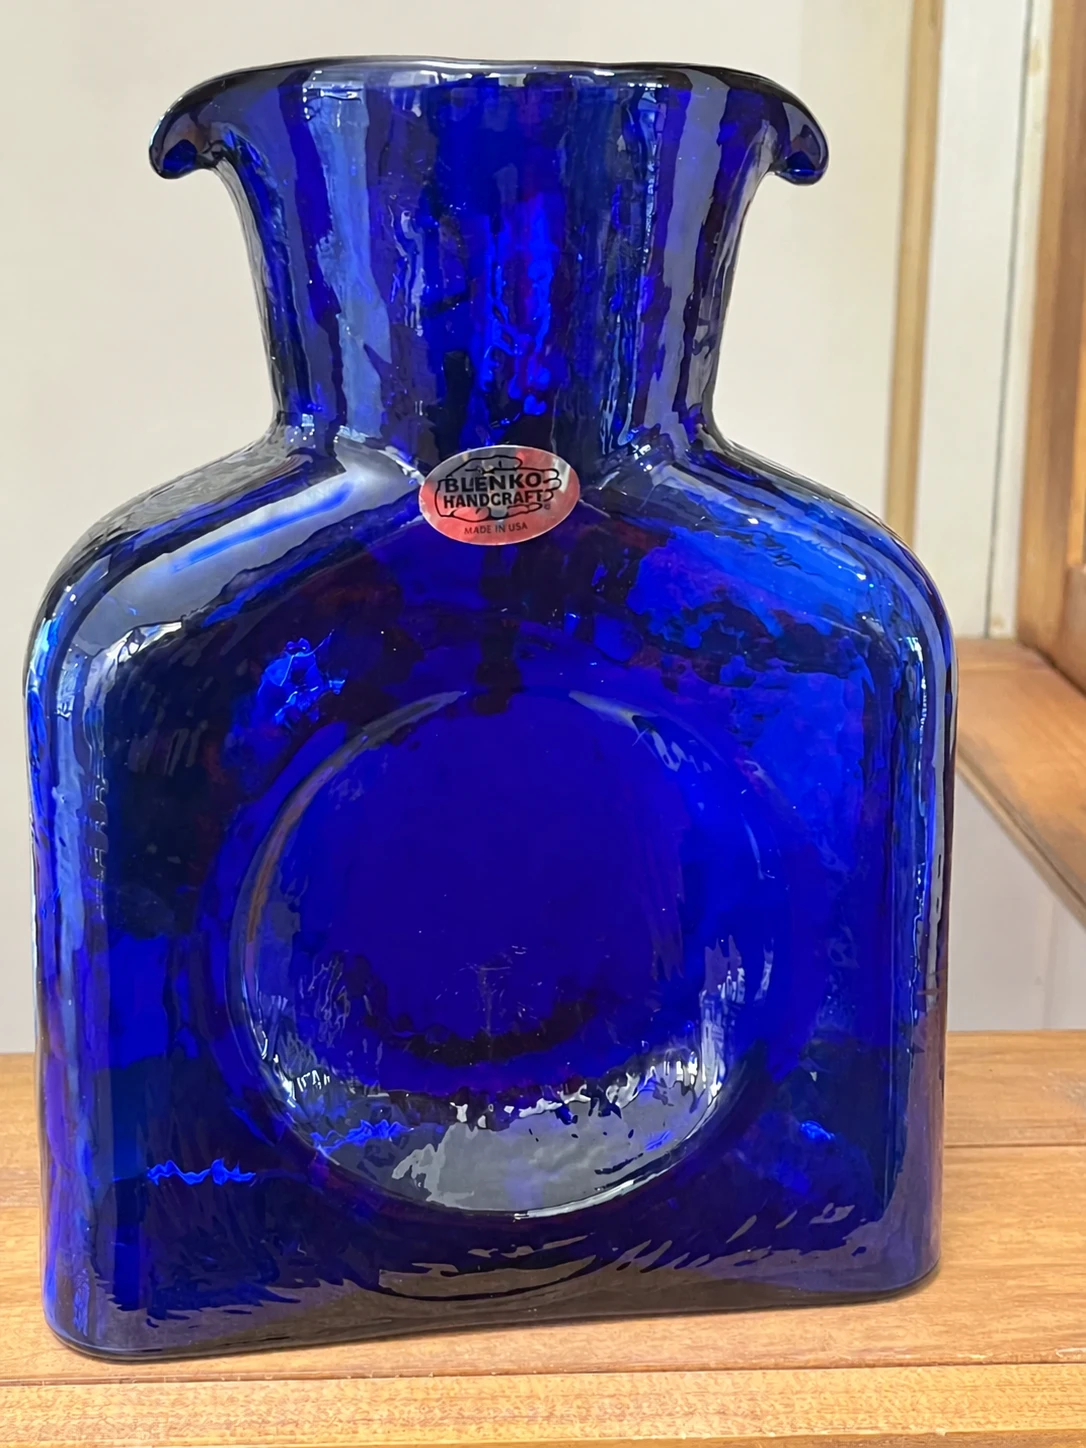
What worked: the plants disappeared, the pale wall continued behind the bottle, and the wooden surface remained. The asymmetric pouring lips, label position and broad reflection pattern stayed close enough to the source to make the edit feel restrained.
What to inspect: the fine glass texture and label are rendered more crisply than in the working source. “Keep unchanged” did not turn this into an edit that preserved every original pixel. If the exact lettering, wear or manufacturing detail matters, compare the original at full size rather than judging the cleaned version in isolation.
Our choice: this is the strongest starting point when the photograph already has the right product, framing and light. Ask for the smallest repair that solves the problem.
Test 2: change the setting, not the product
The brief: replace the whole setting with a pale-grey studio background and a matte stone surface, while retaining the photographed bottle.
The prompt we used
Use case: precise-object-edit. Input image is the edit target. Replace the flowers, leaves, wall and wooden tabletop with a clean pale-grey studio background and neutral matte stone surface. Keep the blue glass water bottle exactly as photographed: same silhouette, double spouts, neck width, circular indentation, rippled glass, blue hue and small pink oval label. Keep the camera angle and entire bottle in frame. Add only a soft contact shadow consistent with the surface. Do not redraw, redesign or smooth the product. This is a controlled product-photo fidelity experiment. No added text.
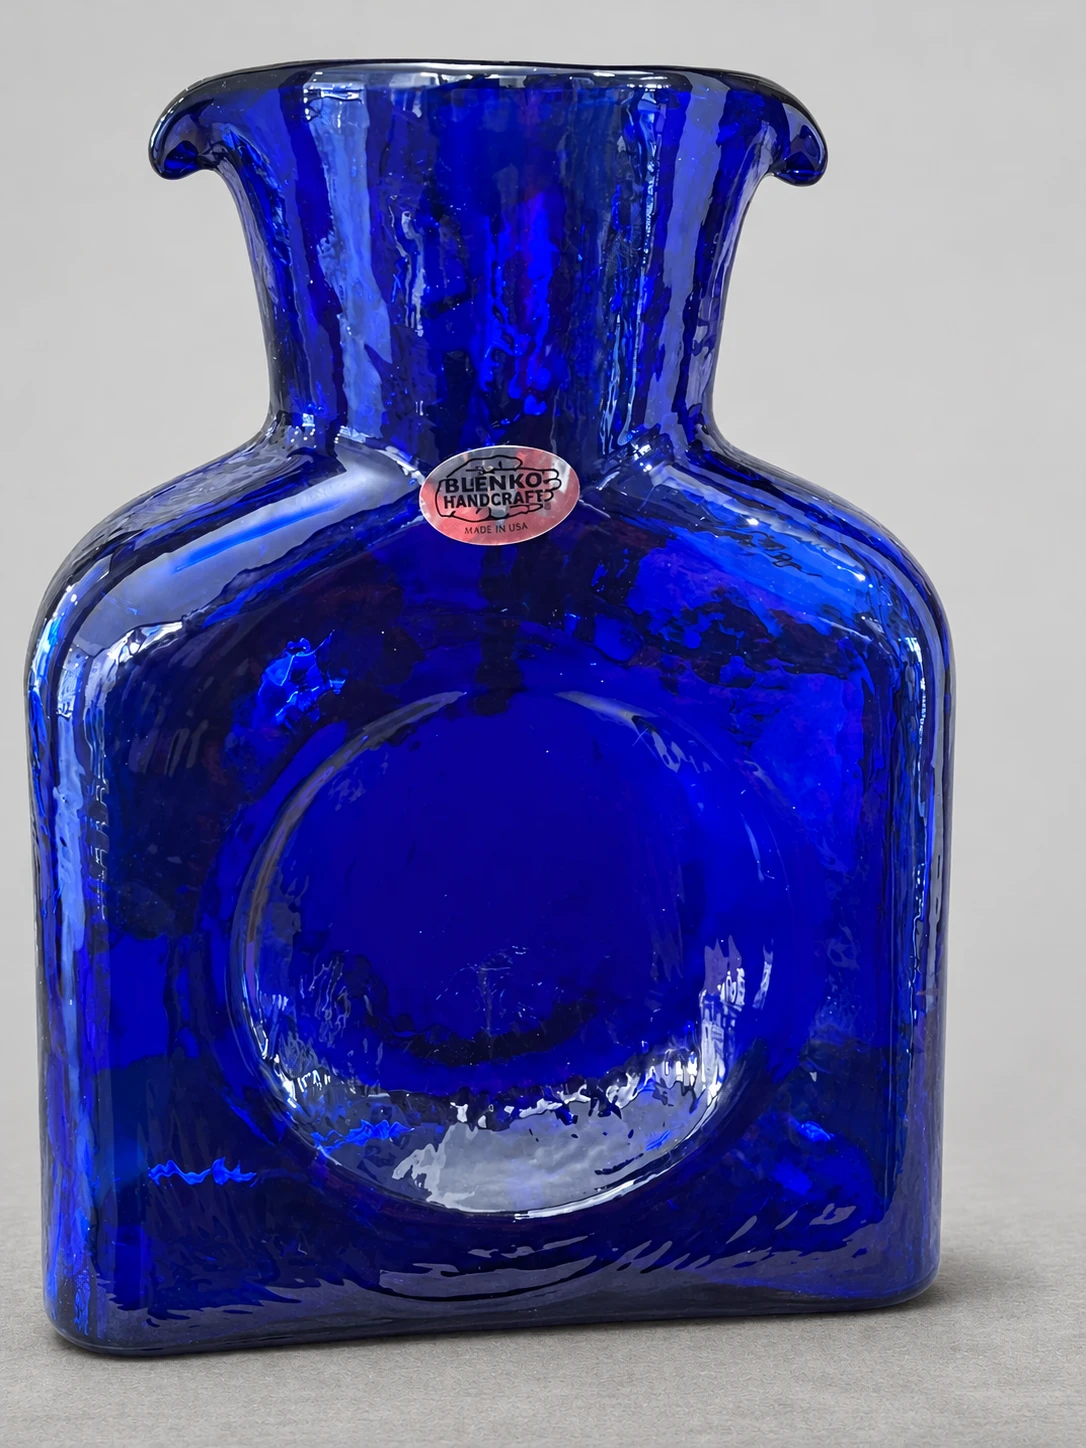
What worked: the flowers, wood and room disappeared. The broad bottle outline and the bright reflection around its central depression remained recognizably close to the source. The quieter setting would give a creator more room to build a consistent visual series.
What did not become a studio reshoot: the bottle still carries much of the original reflection pattern. A new background does not automatically create the reflections that a real grey studio would produce inside transparent glass. That can work for a graphic composition, but a convincing studio treatment also needs reflections that match the new setting.
Our choice: use this direction when the setting is the problem. For an exact product listing, keep the original product on a protected layer in a conventional editor and build the new setting behind it. Transparent edges and transmitted background color still need attention.
Test 3: regenerate a polished product image
The brief: use the source as a reference and ask for a complete studio-style re-render. We kept the grey setting so the biggest difference would be the freedom to redraw the product.
The prompt we used
Use case: product-mockup. Input image is a product reference. Generate a new premium studio photograph of this cobalt-blue glass water bottle on a pale-grey seamless backdrop and neutral matte stone surface, soft sculpted light, subtle contact shadow. Re-render the complete image rather than merely cleaning the existing background. Match the product's rectangular body, double pouring spouts, broad neck, round central indentation, rippled glass and pink oval label as closely as possible. Keep the entire bottle in the frame and camera angle close to the reference. This is a controlled product-photo fidelity experiment. No added typography or props.
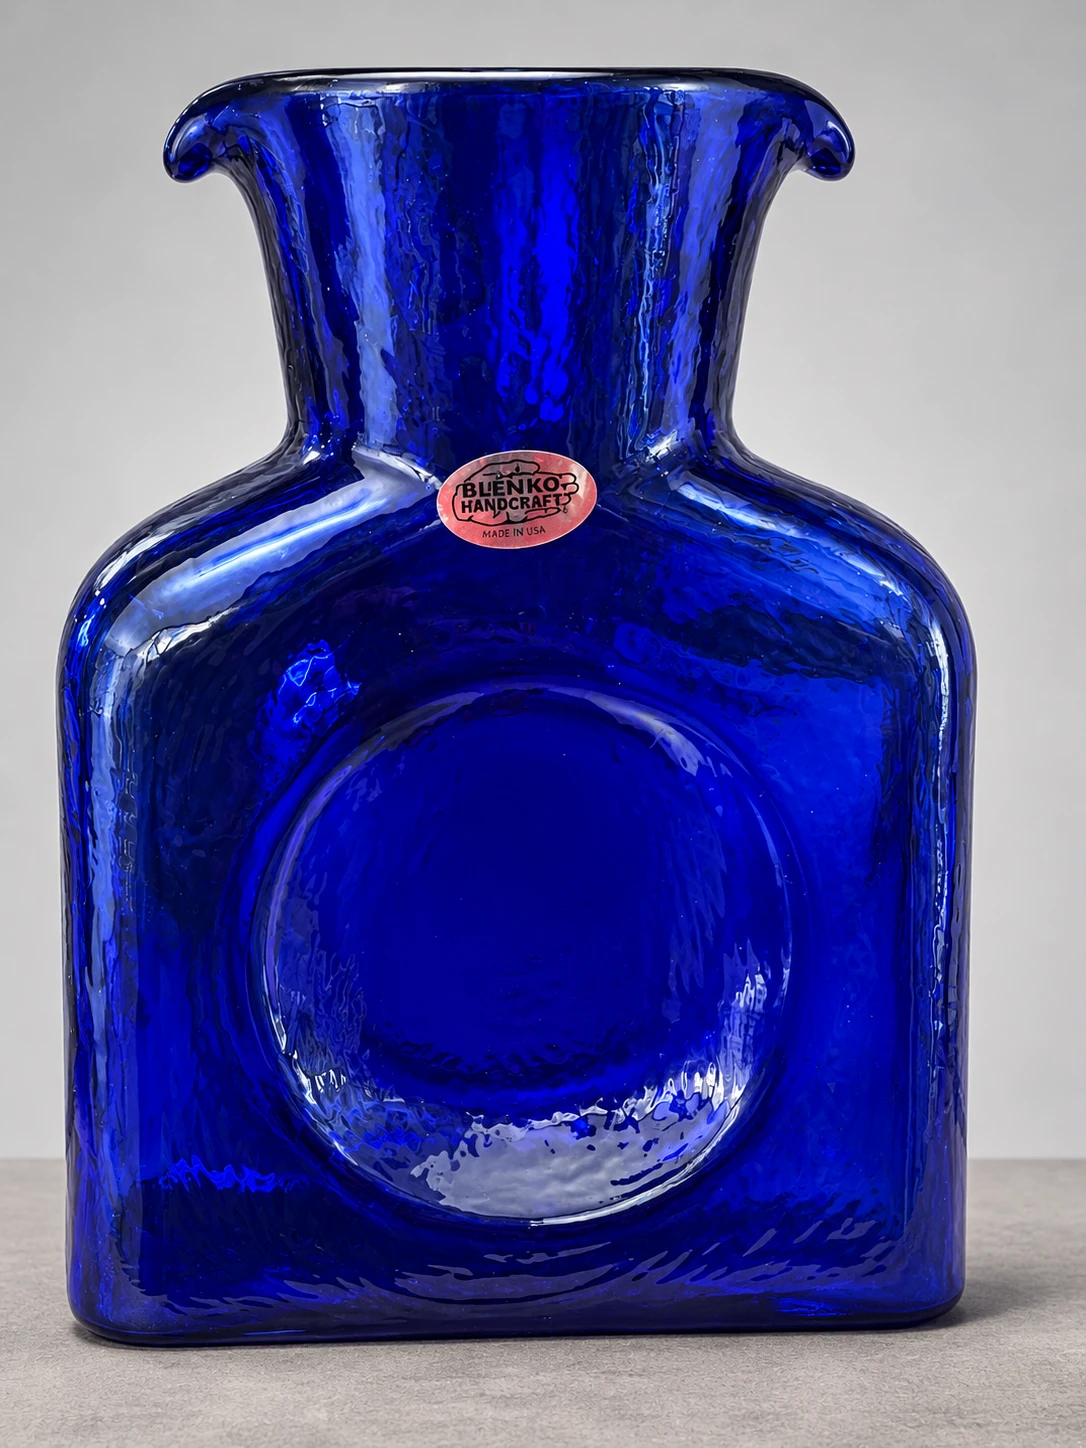
What worked: the result has a more symmetrical presentation, a crisp rim and a coherent grey studio setting. The cobalt glass reads clearly, and the image looks intentionally produced rather than rescued.
What changed: the body became more upright and regular, the central depression and its reflections were redrawn, and the label appears larger. The glass surface has a different pattern of highlights and ripples. It is recognizably the same kind of bottle, but it is not the same photographic record of this object.
Our choice: useful for exploring a campaign direction or showing a proposed lighting treatment. We would not use this output as the sole evidence of the exact item a customer will receive.
Six more products, six different editing problems
Each pair below starts with a real photograph released under CC0. The prompts were run once on 10 November 2026. Working copies were resized and converted for display; the generated outputs were not manually retouched.
Jewelry: clean the table, not the silver
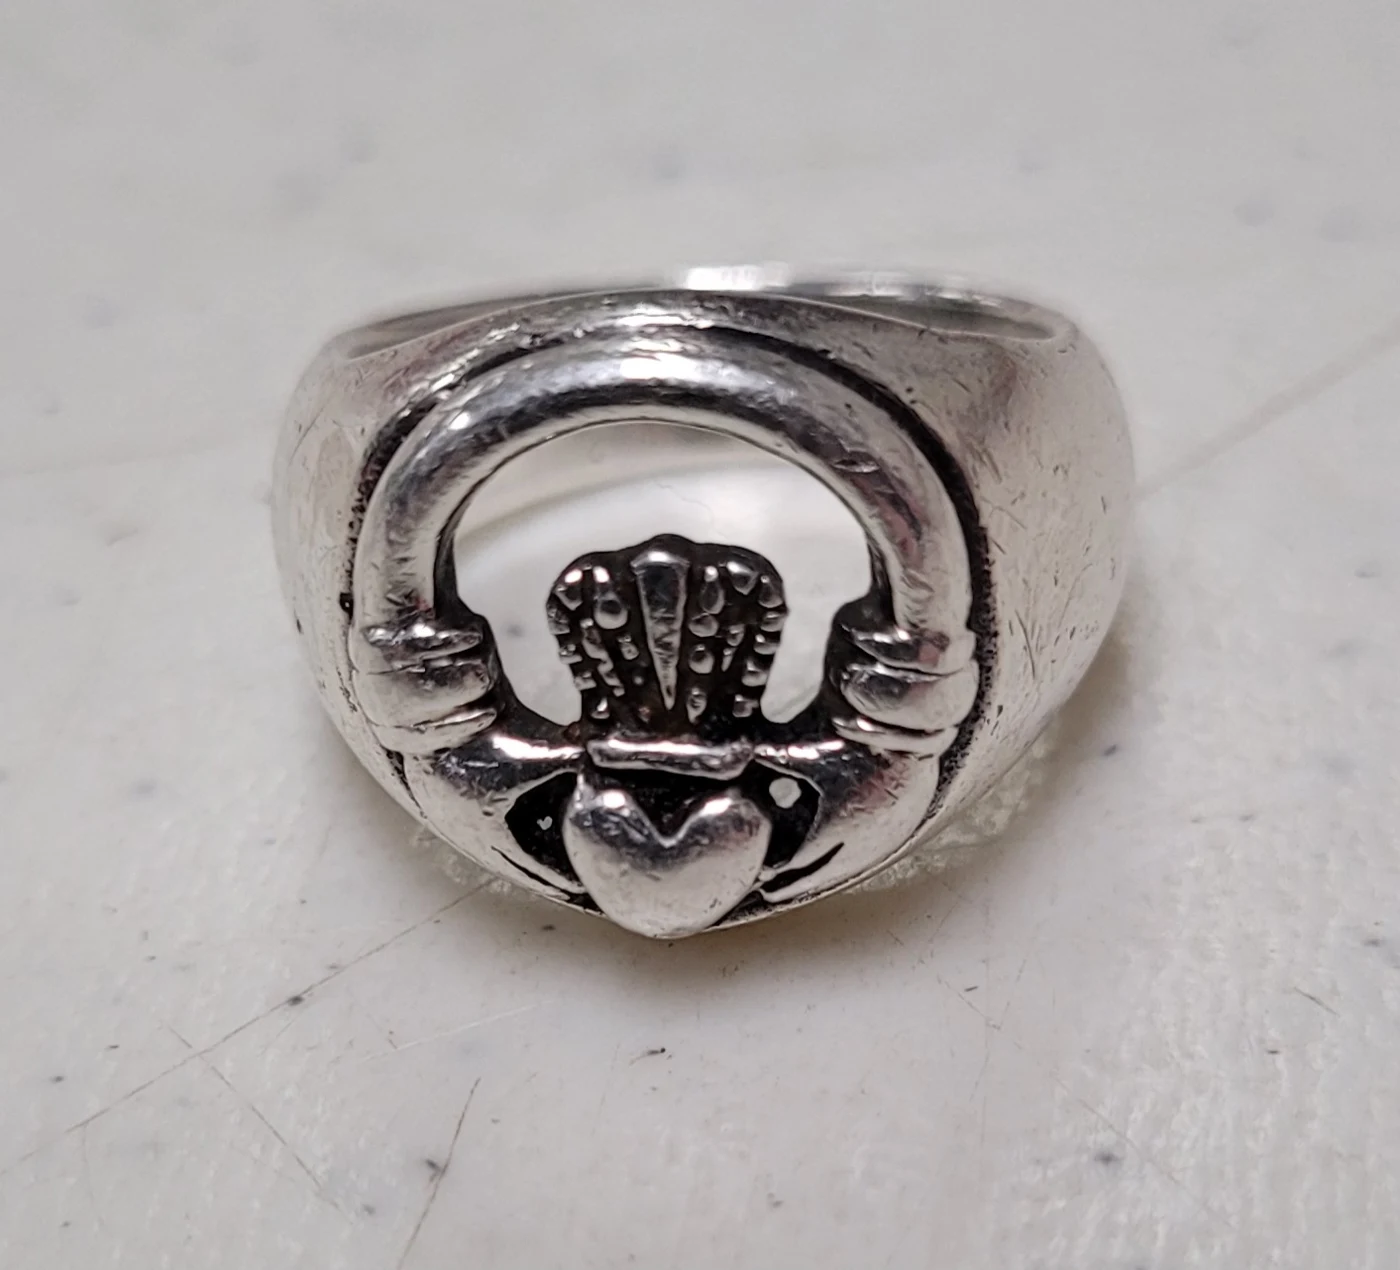
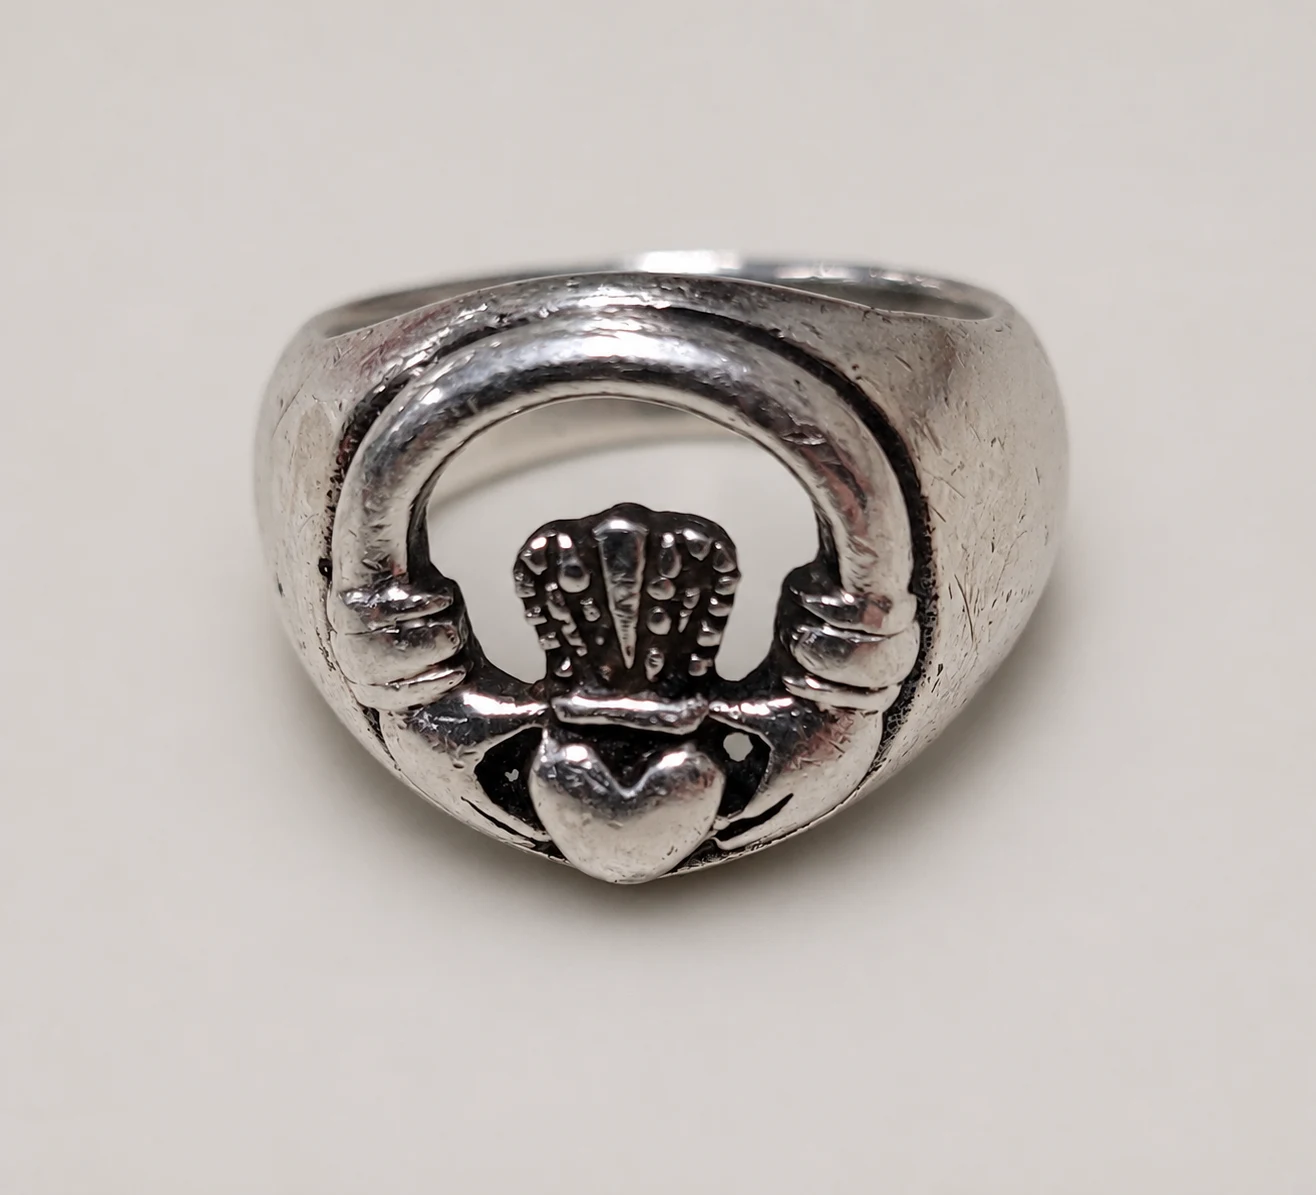
The scratches on a tabletop and the scratches on a used ring are different editing problems. We asked AI to clean the former and leave the latter alone. The smooth neutral surface makes the Claddagh heart, crown and hands much easier to pick out in a small listing image.
The prompt we used
Use case: precise-object-edit. Edit target: the supplied real photograph of a silver Claddagh ring. Clean only the white tabletop: remove its dust, hairs and scratches and make it a smooth neutral off-white surface with a natural contact shadow. Preserve the ring exactly as photographed, including its position and scale, heart, crown, hands, opening, silver reflections, scratches, dents and dark patina. Do not polish, beautify, sharpen, redesign or reconstruct any part of the jewelry. Keep the same crop. No added text.
Fine metal marks and bright reflections along the shoulder and upper arch shifted, even though the ring stayed recognizable. The prompt did not simply protect the jewelry and repaint the table. For a vintage Etsy or eBay listing, use a background selection that leaves the ring itself untouched, and include real close-ups of the wear and hallmarks.
Source photograph and license · CC0 1.0

Clothing: better framing, wrong label
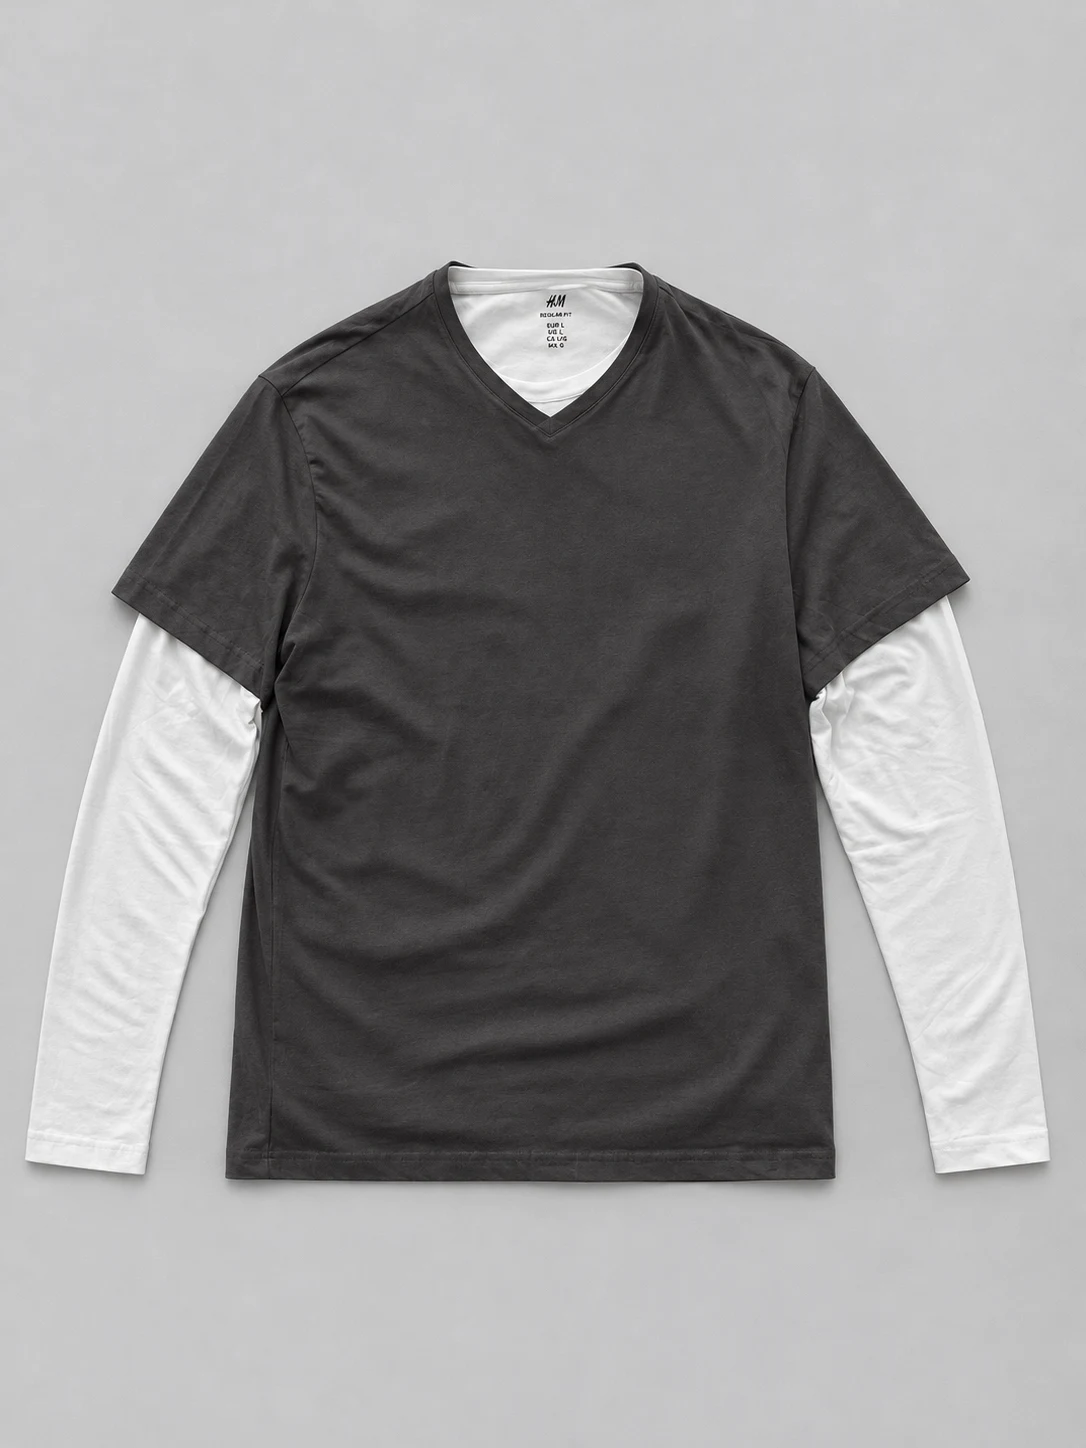
The original flat lay has familiar resale-photo distractions: shoes, a chair, the table edge and heavy creases. The edit removes the room, centers the layered shirts and keeps the cuffs and hem visible. It is a much cleaner composition.

The prompt we used
Use case: precise-object-edit. Edit target: the supplied real flat-lay photograph of a charcoal V-neck short-sleeve shirt layered over a white long-sleeve shirt. Make a clearer clothing-listing photograph: remove the photographer's legs, shoes, chair, floor and table edge by replacing only the surroundings with a continuous pale-grey matte studio surface. Center the complete two-shirt arrangement with every sleeve cuff and hem visible. Preserve both garments' exact cut, proportions, collar construction, colors, hems, stitching and visible neck-label text. Reduce only the strongest temporary fabric creases while retaining natural cloth texture and softer folds; do not alter garment size, remove wear, invent text, fuse the two garments or add accessories. Keep an overhead flat-lay perspective. No added text.
But it also makes the shoulders and sleeves more symmetrical and rebuilds the neck label. The original fit line reads “SLIM FIT”; the generated lettering differs. That fails the product-detail check. For an eBay or Facebook Marketplace listing, separate background cleanup from wrinkle reduction. Keep a real label shot and measurements; steam and reshoot the garment when folds obscure its fit.
Source photograph and license · CC0 1.0

Handmade pottery: keep the irregularities
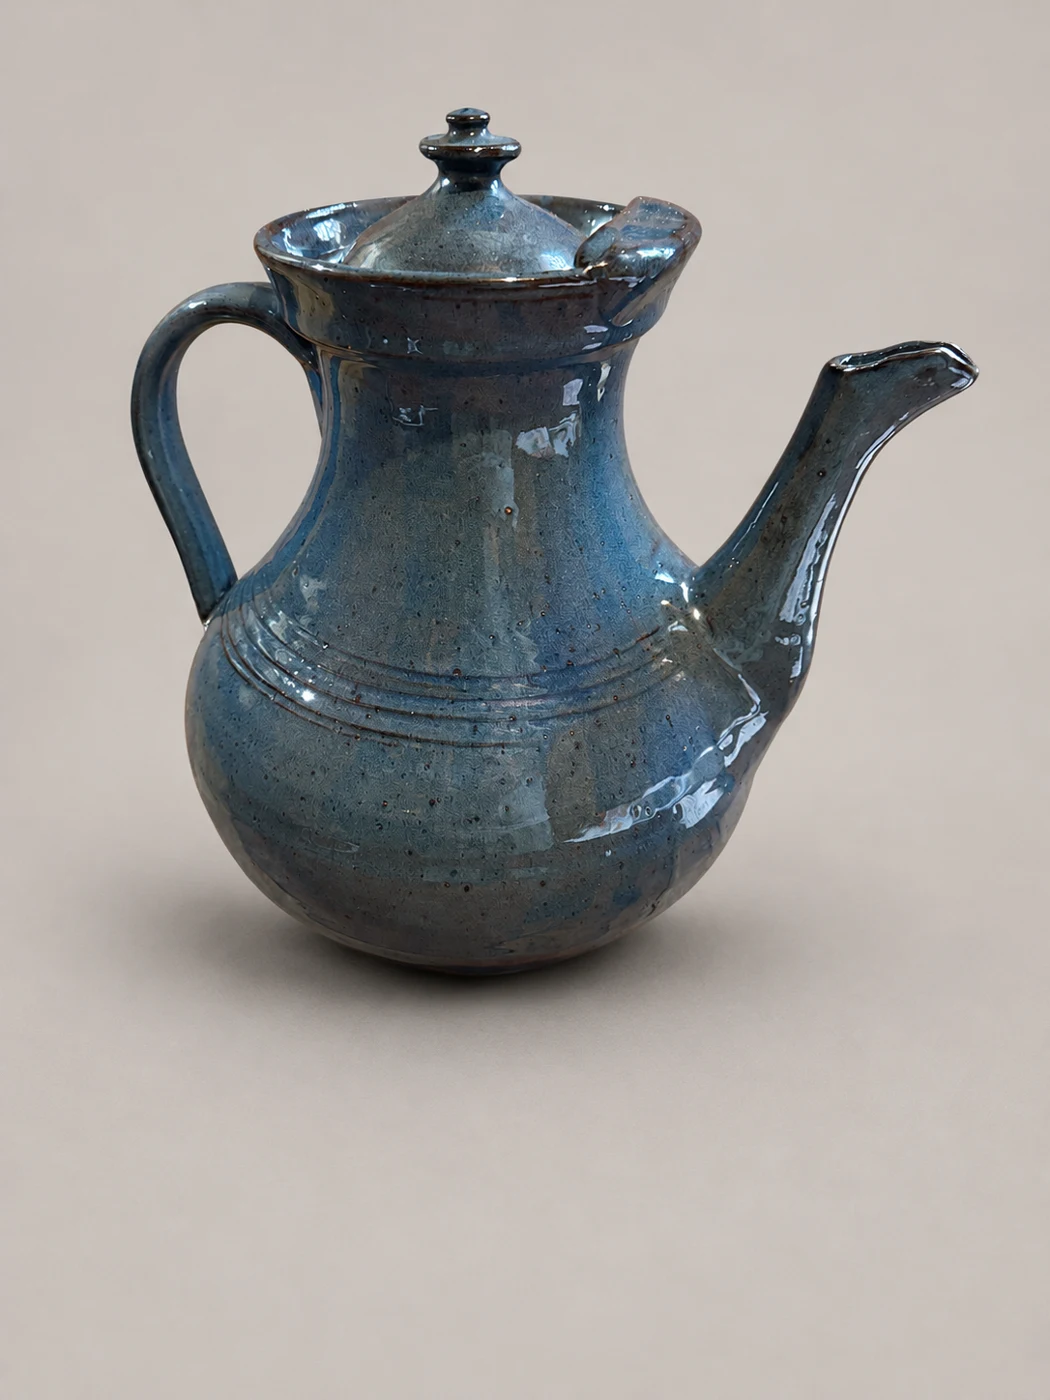
The wooden wall competes with the handmade teapot’s silhouette. Replacing it with a quiet backdrop gives the lid, handle and long spout breathing room. The edit keeps the unusual raised section beside the lid, the throwing rings and the broad blue-grey glaze pattern recognizable.

The prompt we used
Use case: precise-object-edit. The attached image is the edit target. Replace only the wooden wall and tabletop behind and beneath this handmade blue glazed teapot with a quiet light warm-grey seamless studio background and matte surface. Keep the entire original teapot exactly as photographed, including asymmetric lid and rim, raised protrusion beside the lid, long spout opening, loop handle, blue-grey glaze variations, dark speckles, throwing rings and reflected highlights. Same angle and proportions; add breathing room around the whole object and a soft contact shadow. Do not smooth handmade texture, invent extra parts, alter the lid, recolor the glaze, add props, labels or text.
Closer inspection shows a brighter, more evenly resolved surface and redistributed fine speckles. The original bright reflections are still prominent even in the new setting. For an Etsy craft listing, those glaze variations are part of the item, not noise to erase. This is a useful presentation direction; a final image should preserve the actual ceramic surface rather than standardize it.
Source photograph and license · CC0 1.0

Used electronics: less glare, different wear
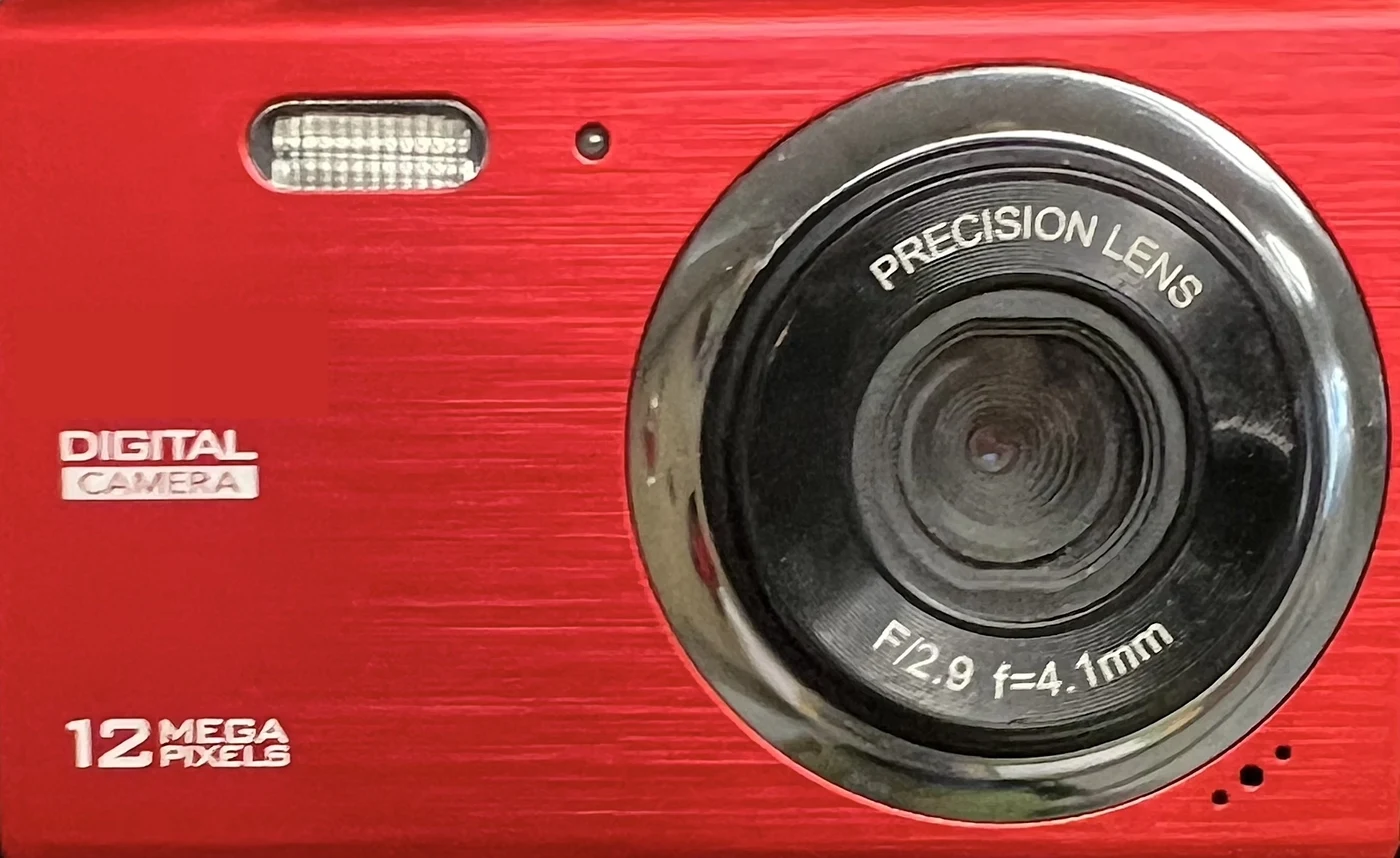
The camera prompt asks for a narrow change: soften glare on the silver lens surround while preserving its wear and printed specifications. The result retains the red front, flash and three small lower-right holes. The main lens words remain readable, and the outer ring is less reflective.
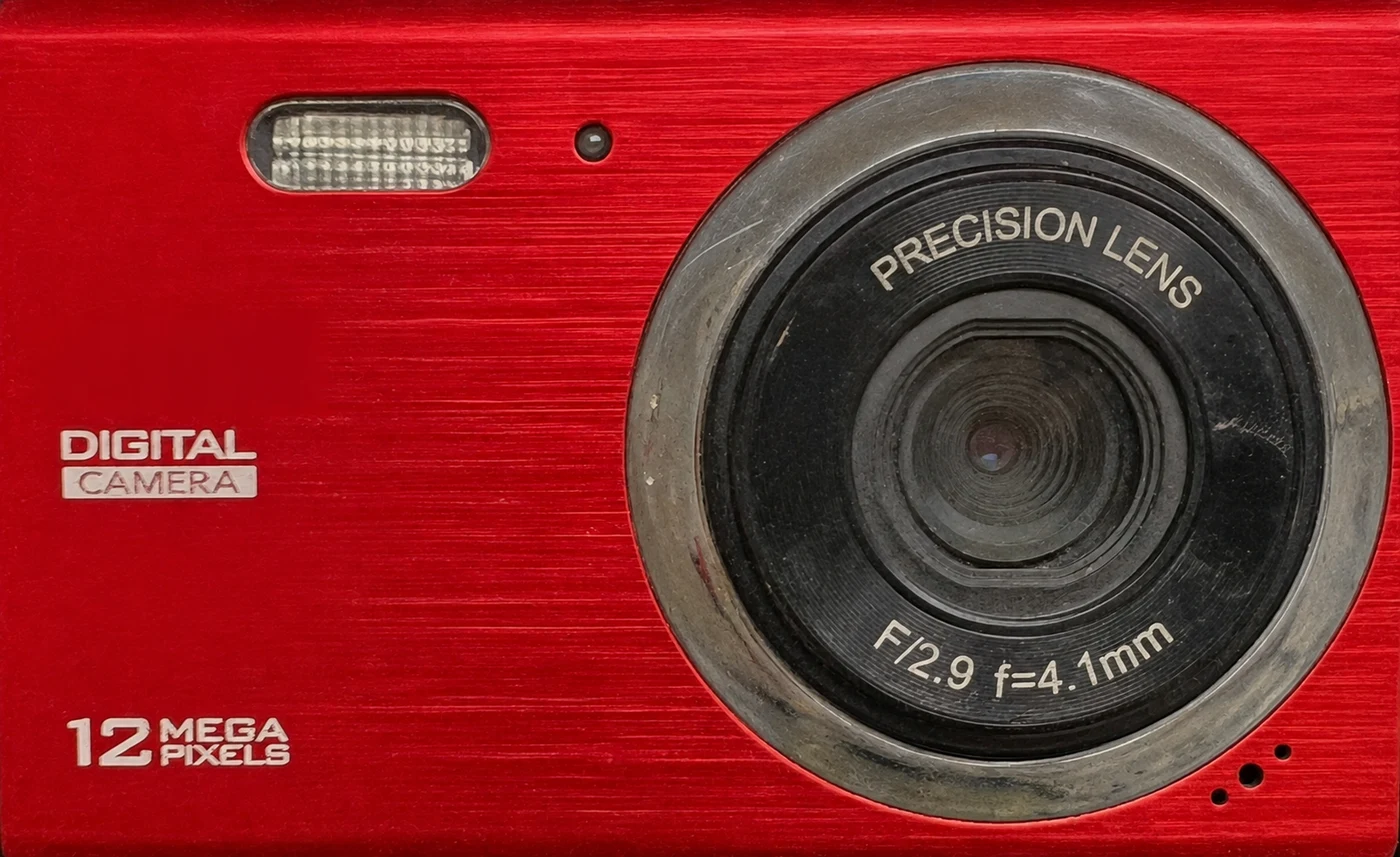
The prompt we used
Use case: lighting-weather. Input image is the edit target, a close-up of a used red compact camera. Make the lighting less harsh by reducing distracting bright reflections on the outer silver lens ring and balancing exposure gently. Keep the exact framing, red body color, lens size, every lens marking and printed letter, sensor and flash arrangement, three lower-right holes, visible scratches, wear and dust unchanged. Do not restore or beautify the camera, invent cropped edges, change the lens glass or replace any hardware. This is a used-item listing detail photo, not a new-product advertisement. No added typography.
The whole image is darker, however, and the fine scratches and lettering edges have been reinterpreted. For a used-camera listing, that is the wrong trade: condition is the information buyers need. Use ordinary exposure controls or change the light and retake the close-up. The source photographer had already removed the brand logo before uploading this photograph; our “before” is that published source, not an untouched camera original.
Source photograph and license · CC0 1.0

Bicycles: the background is also behind the spokes
The plain wall makes the recumbent bicycle much easier to read. The large rear wheel, smaller front wheel, reclined seat, rack and orange-and-black bag remain recognizable. This is the appeal of background replacement for a quick Facebook Marketplace photo.
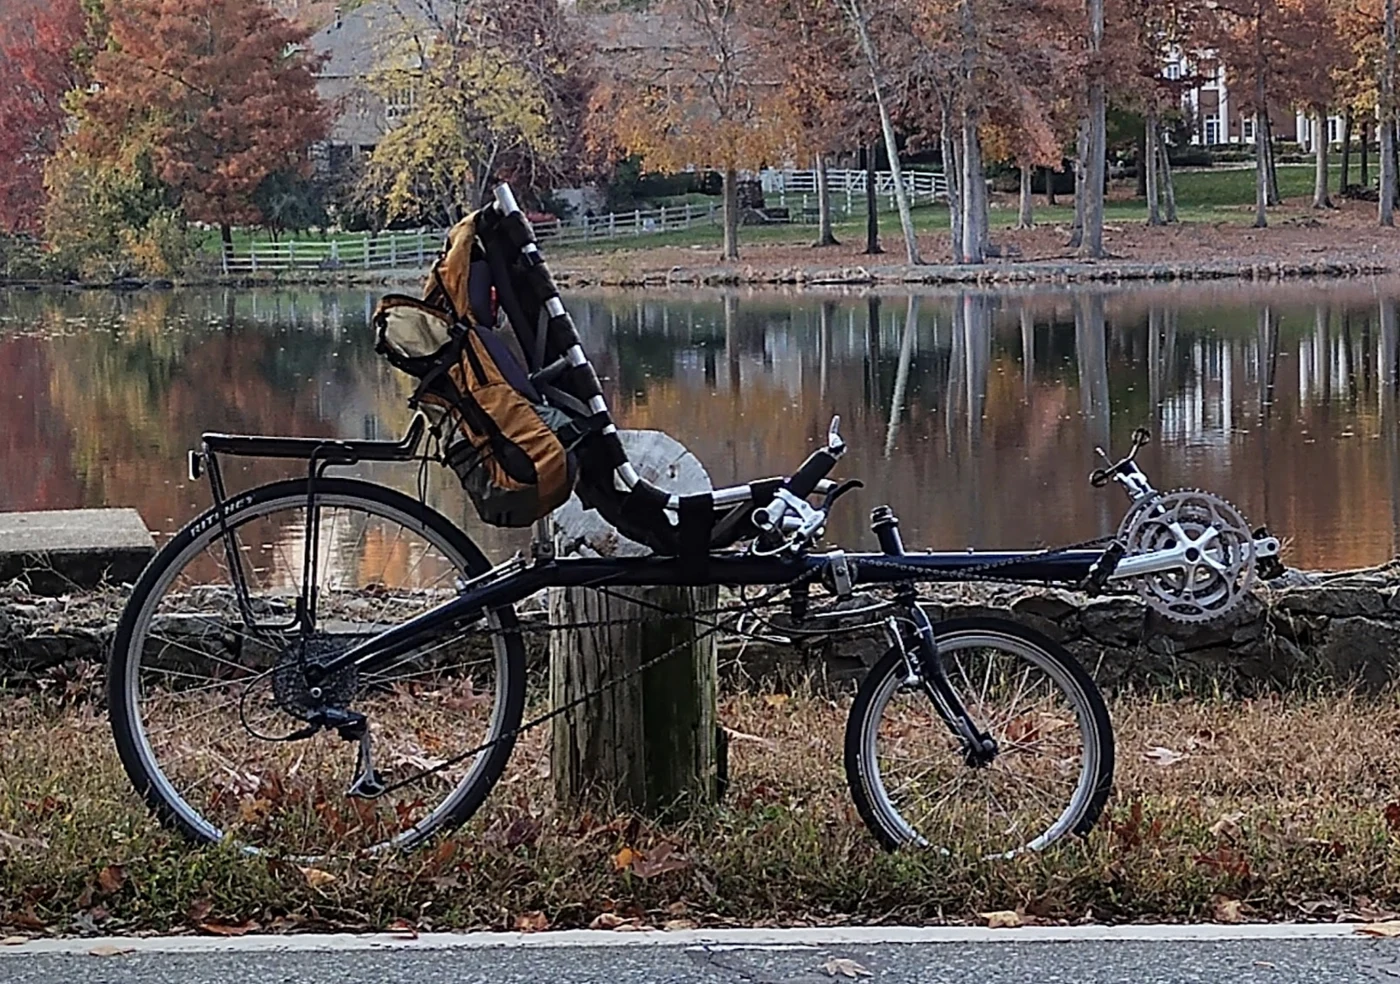
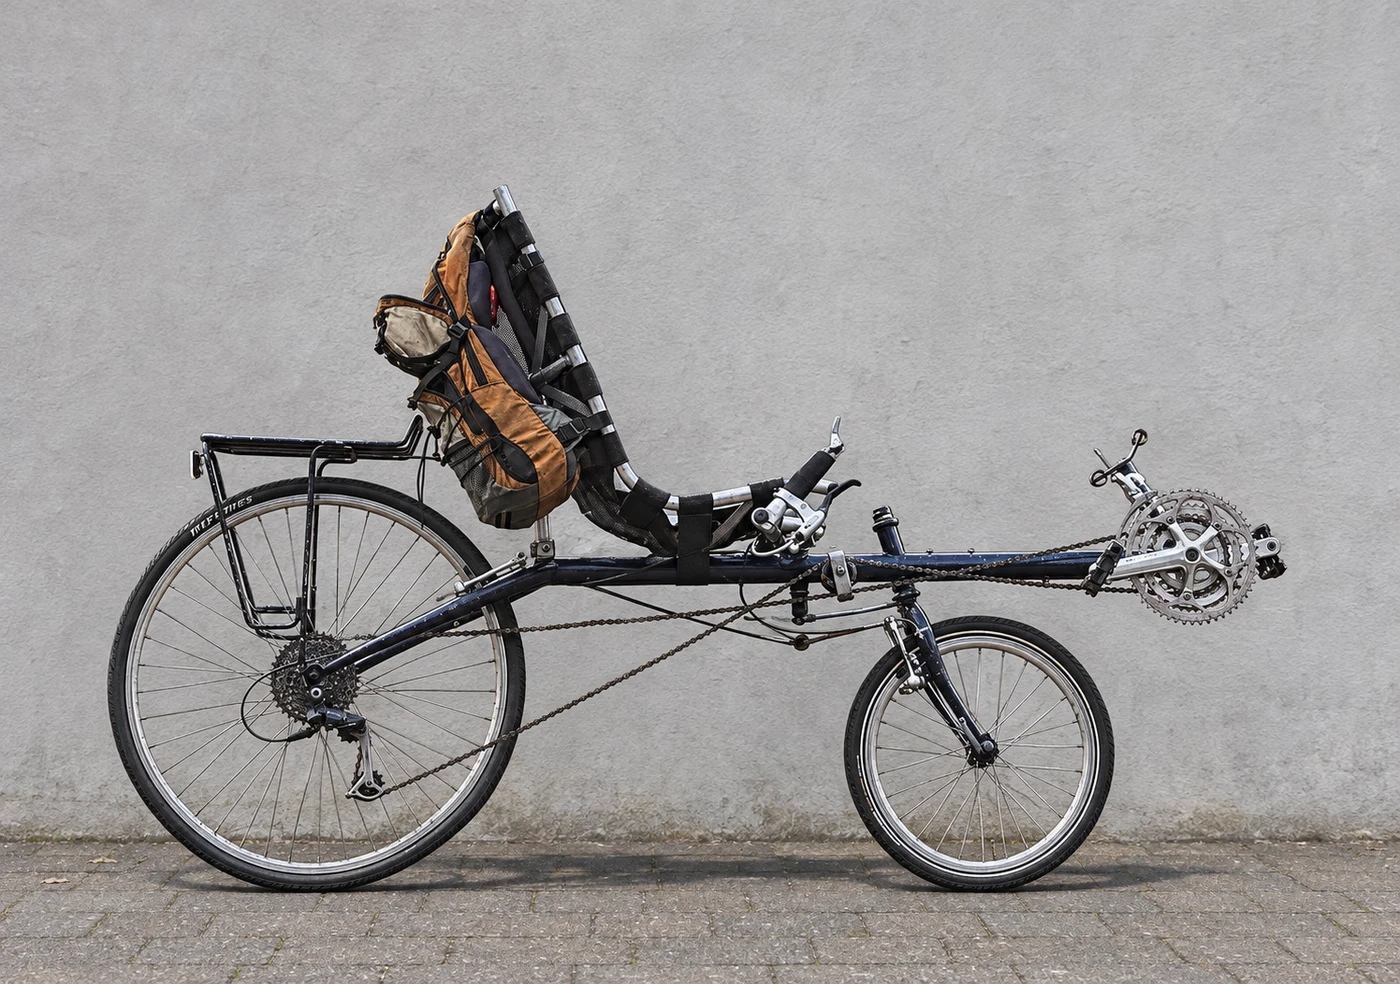
The prompt we used
Use case: precise-object-edit. Input image is the edit target: a recumbent bicycle beside a lake. Replace only the busy park background and foreground with a simple neutral light-grey wall and paved ground, as a clean used-bicycle listing photograph. Preserve the exact bicycle, viewing angle, two unequal wheel sizes, every visible spoke, chain path, gears, pedals, steering linkage, mesh seat, rear rack, attached bag, cables, marks and wear. Keep all bicycle parts fully in frame. Do not repair, redesign or remove accessories, invent missing parts or change condition. Soft natural daylight and a believable contact shadow only. No text.
The difficult parts are the gaps. Grass hides portions of the original tires, so the output reconstructs their lower edges and contact points. Chain, spokes and small mechanical details are redrawn as well. A convincing outline is not enough for an inventory photo. Shoot the bicycle against a simpler wall, or mask the real object carefully, then add original drivetrain, brake and wear close-ups.
Source photograph and license · CC0 1.0

Food: brighter light without inventing a better recipe
The cake test leaves the setting alone and asks only for exposure and white-balance correction. The plate becomes much brighter and more neutral, the cake layers are easier to see, and the single slice remains a single slice. No decorative fruit, cream or garnish appears.


The prompt we used
Use case: lighting-weather. The attached image is the edit target. Improve this cake photo for a bakery product listing using only natural exposure and white-balance correction: lift the dim cake and plate, neutralize the blue-grey cast on the white plate, retain believable soft light and the warm wooden table. Preserve the exact single slice, size, triangular shape, rough crumb texture, chocolate filling layers, uneven frosting and original camera angle and crop. Do not add garnish, cream, fruit, crumbs, text or props. Do not smooth, enlarge or redesign the food.
Yet the output is not simply the same pixels made brighter. Fine cracking on the frosting becomes much more pronounced, crumb details shift, and the plate decoration is more strongly rendered. For a bakery menu, first try ordinary exposure and white balance: they can deliver the desired brightness without rebuilding the cake. If using a generative edit, compare the portion, filling, frosting and texture, not just whether it looks appetizing.
Source photograph and license · CC0 1.0

Turn a cleaner photo into a useful listing
Etsy: keep at least one unedited photo of the actual item against a real background for most products. Etsy allows editing, including AI, in other listing images when the item remains accurately represented. Its listing-image requirements, updated 5 November 2026, explain the product-specific exceptions.
eBay: its picture policy rules out images that misrepresent the item and stock photos for used, damaged or defective items. A new background is not a reason to lose the wear that distinguishes your actual item.
Facebook Marketplace: make the object and its condition easy to inspect. Our practical recommendation is a complete real-item photo plus close-ups of model details, included accessories and wear. For books, that means the actual edition, cover, spine, page edges and marked pages.
Food and crafts: compare the details that make this particular product yours: portion size, filling, stitch pattern, glaze, handmade asymmetry and materials. Background cleanup is valuable when it helps people see those details, not when it replaces them.
The useful distinction: repair, restyle, or invent
- Repair: remove an unwanted object or small distraction. Keep the original composition when it already works.
- Restyle: replace the setting or adapt the layout. Check the product edges, reflections and contact with the new surface.
- Invent: regenerate a scene from a reference. Treat the result as a new interpretation, then decide whether that interpretation fits the job.
All three can produce attractive images. The wrong choice is using a concept image for a job that needs an exact record. A vintage listing depends on the actual scratches and shape; a mood board does not.
OpenAI’s documentation also identifies limitations in precise text rendering, visual consistency and composition control. Our test makes those concerns concrete: a clear preservation prompt helped steer the result, but it did not certify the bottle’s geometry or label. Read the image-generation documentation.
A repeatable workflow for your next product edit
- Start with a complete reference. Photograph the whole object, including rims, handles and edges. Take a close-up of labels and surface details. A second angle is often more useful than a longer prompt.
- Write the one change you need. “Remove the plant behind the bottle” gives the editor a smaller problem than “make this look professional.”
- Name the details that must survive. Use concrete features: pouring lips, handle width, printed words, fabric weave or worn edges.
- Keep edits independent while comparing approaches. Start each candidate from the original. Otherwise a second edit can inherit the first edit’s mistakes.
- Compare like with like. View the original and output at the same displayed size. Inspect the silhouette first, then texture, lettering and reflections. Finally check the crop where the image will actually appear.
- Stop when the task is solved. More generation is not necessarily more improvement. If an important detail drifts, return to the original or composite the original product rather than repeatedly asking the model to repair its own reconstruction.
What about a poorly cropped image?
A bowl rim touches the top edge. A guitar neck disappears out of frame. A tall chair barely fits a narrow portrait frame. Sometimes only the background needs extending; sometimes the editor has to create parts of the object that the photograph does not show.
AI can give a tightly framed image enough space to work as a complete composition. We tried three examples, from extra background space to a small missing edge and most of a long object. Each result below is the first output of its prompt.
A bowl with its back rim cut off
The source photograph cuts through the upper rim of this floral enamel bowl. We asked for a wider view of the same scene, keeping the worn finish rather than turning the bowl into a new product.


The whole bowl now fits comfortably. The wall and tabletop continue naturally, and the floral design, blue rim and worn enamel still give it the same character. The result solves the framing problem without adding props or replacing the setting.
The reconstructed back edge is plausible, while fine chips and stains elsewhere also shift. If you are selling this exact vintage bowl, photograph the missing rim to show its actual condition. For an illustration or layout concept, the wider composition is immediately more usable.
The prompt we used
Use case: precise-object-edit. The input image is the edit target: a real enamel bowl photographed too tightly, with the upper back rim cut off. Extend the canvas upward and slightly to the sides so the entire bowl and complete elliptical rim sit comfortably within the frame with visible margin. Continue the existing pale wall and wood-grain tabletop naturally. Keep the original viewing angle, bowl body proportions, blue chipped rim, floral paint, stains, worn enamel and contents as close as possible to the photographed source. Reconstruct only the missing upper bowl edge and the background needed for the wider composition. Do not clean, beautify, repaint or redesign the bowl. No added props or text.
Local bowl, Deishini Mariam · CC0 1.0

A complete chair that needs room to breathe
This chair is already fully visible, but the narrow portrait frame leaves little flexibility for a square listing image. We asked AI to extend the wall and carpet sideways rather than invent more furniture.
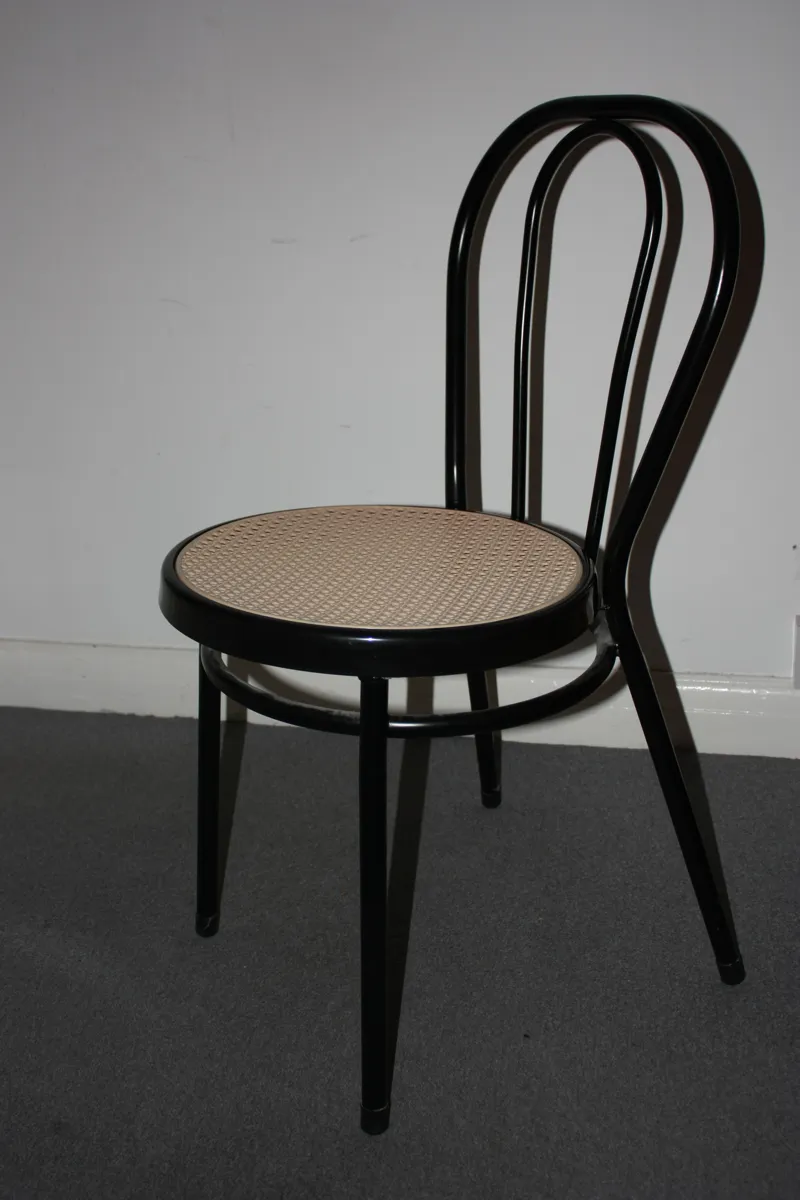
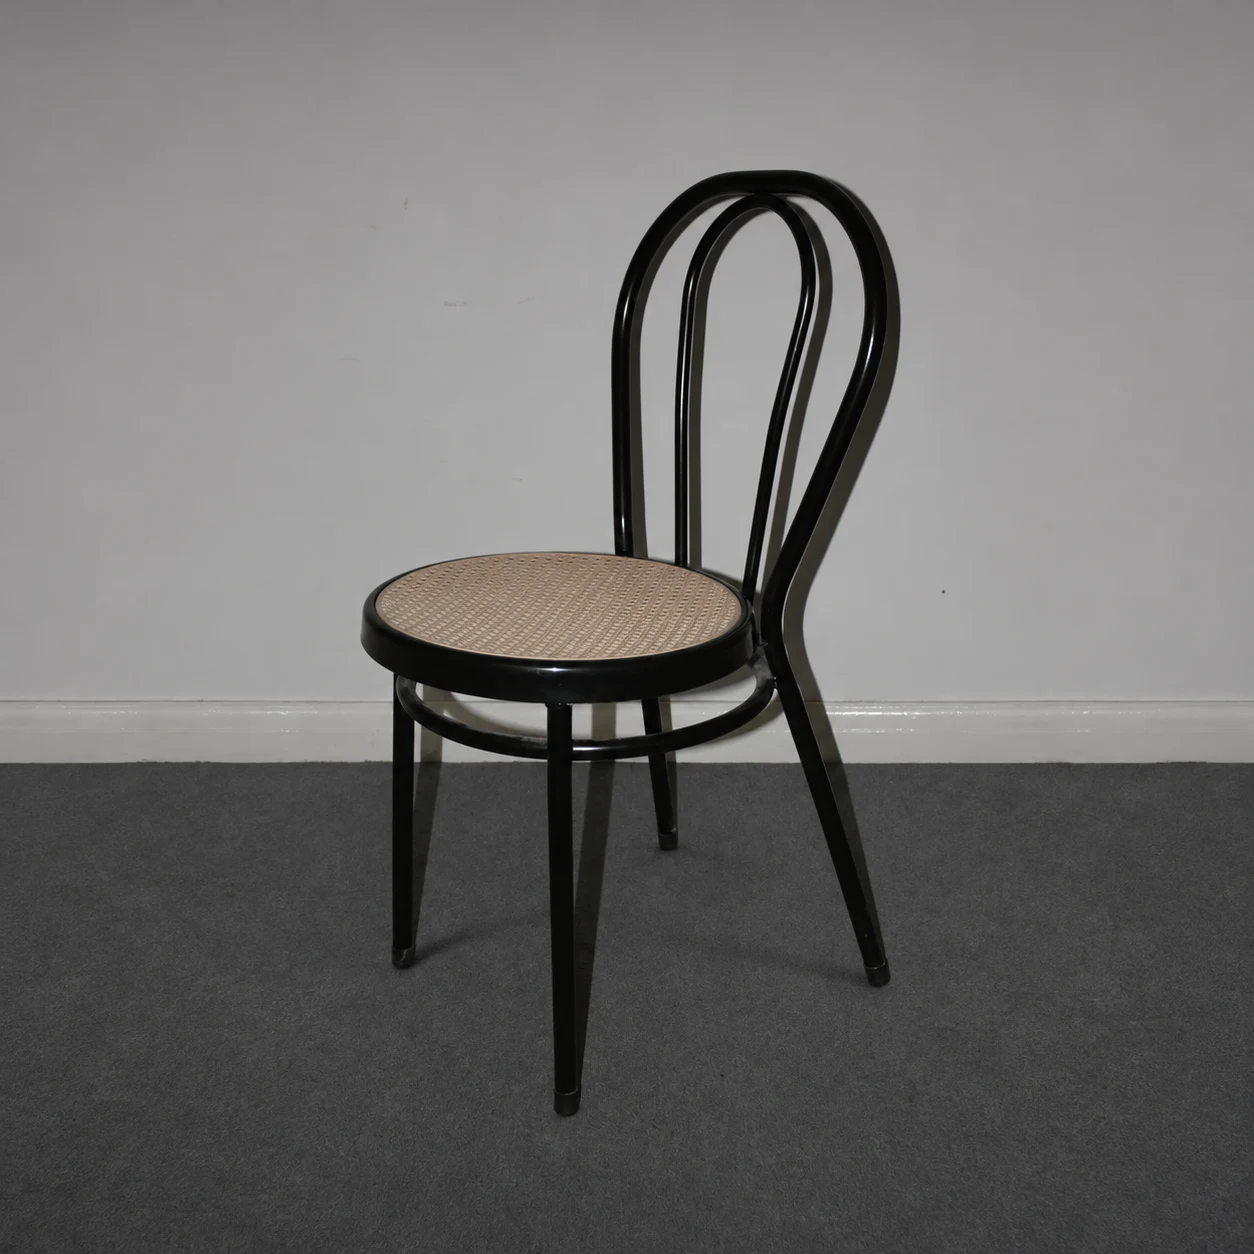
The extra wall and carpet make the chair much easier to place in a square layout. Its bentwood loops, circular brace and cane seat remain recognizable. The output also redraws fine weave and subtle furniture contours, so this is not merely added background around untouched chair pixels. For this kind of job, protecting the complete original chair on a separate layer is the simplest way to keep its details exact.
The prompt we used
Use case: precise-object-edit. Input image is the edit target: a complete black bentwood chair photographed in a narrow portrait frame. Reframe it into a square product image by extending only the room background and carpet sideways, placing the full chair comfortably in the center with generous clear space around its back, seat and all four feet. Keep the chair exactly as photographed: same cane weave, dark bentwood loops, four legs, circular brace, proportions, viewpoint, wear and lighting. Continue the existing plain grey wall, white skirting and grey carpet. Do not replace the chair, redesign its parts, remove wear, relight it or add props or text.
Chair, Antonio Borrillo · CC0 1.0

A guitar close-up turned into a full-length view
The source is a detail photograph, not a failed attempt to show the whole instrument. Most of the neck, the headstock and part of the body are outside the frame. We used it to test the harder request: can AI create a complete-looking guitar from that fragment?

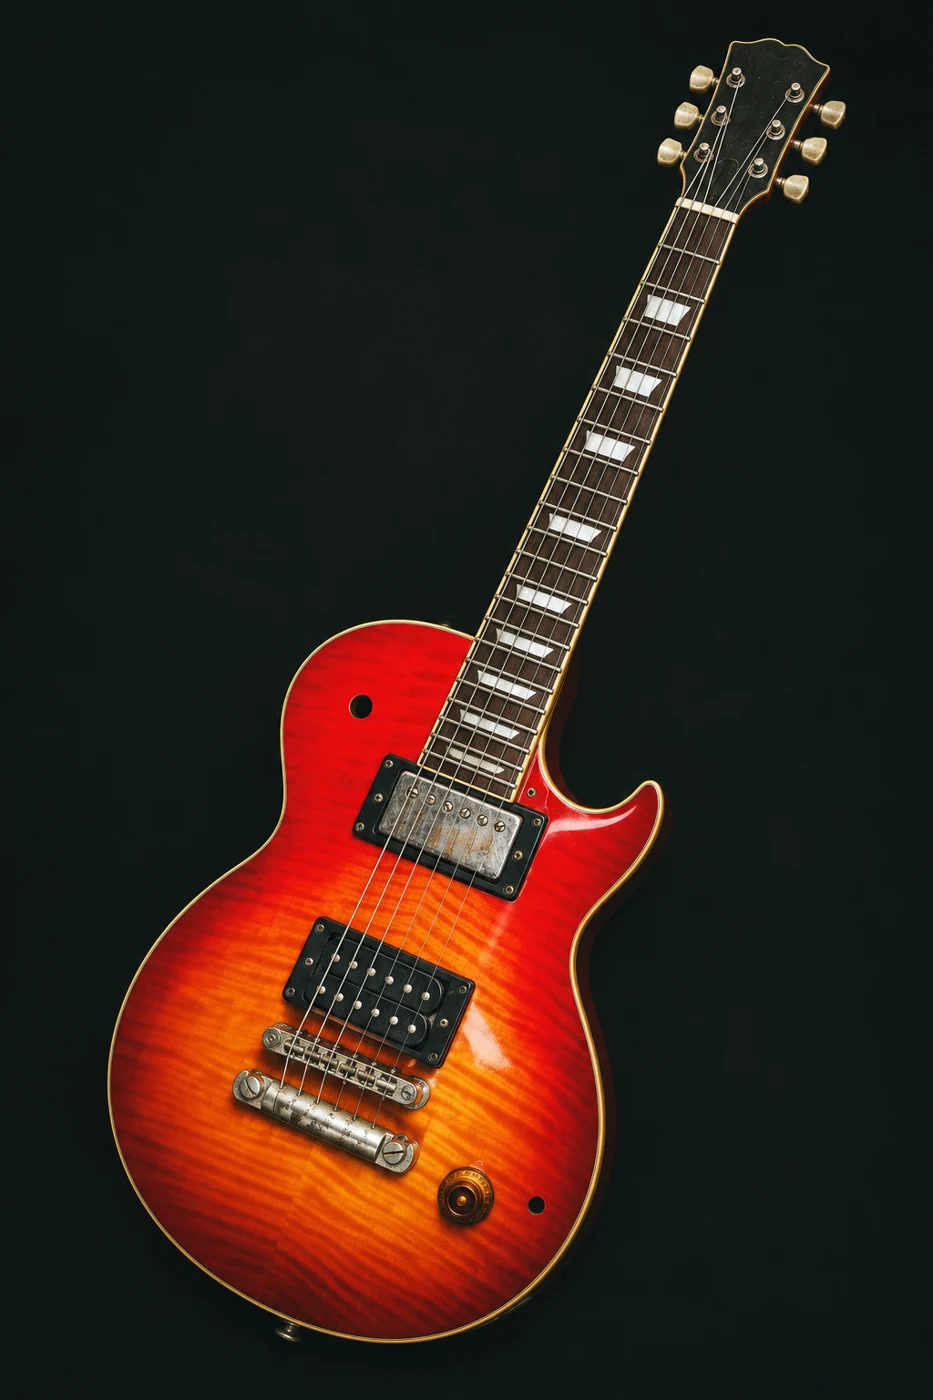
The result is visually convincing at a glance: the red-orange finish, contrasting pickups and cream binding carry through into a full-length composition. This is the most dramatic rescue of the three.
It is also the biggest invention. The headstock, tuning hardware and much of the neck were never visible in the source; the output supplies its own version. Fine hardware and body details are reinterpreted too. Use this result to explore a poster or composition. For a specific instrument listing, start from a full-length photograph so the model, fittings and condition come from the guitar you actually have.
The prompt we used
Use case: precise-object-edit. Input image is the edit target: a tightly cropped photograph of a red-orange electric guitar. Expand the composition into a full-length portrait image showing the entire guitar, including the missing neck, headstock, tuning pegs and complete lower body, with clear space around every edge. Preserve the visible red-orange figured finish, cream binding, single cutaway, two different pickups, bridge, strings, camera angle and worn metal details. Continue the dark understated background. Do not add brand names, logos, stands, people or decorative props. Keep the visible portion as close to the original as possible.
Guitar, freestocks.org · CC0 1.0

Choose how much to reconstruct
Only the background is missing: extend the canvas and keep the object untouched. A small part of the object is missing: compare the new edge with another photograph if its shape or condition matters. Most of the object is missing: use the result to explore composition, then supply a complete reference for the final image.
The useful prompt is specific: name the clipped part, describe the margin you need, and say what must stay. “Show the complete back rim with space above it” gives a clearer target than “fix this photo.”
Try this on a photograph you already own
Pick one product image with a clear, fixable problem. Make a minimal cleanup version first. Only then test a new background or a full regeneration, keeping the originals together. Judge each version against its job, not just against the most polished picture.
Image credits and sources
- Source photograph: Blenko384waterbottle.jpg, TwoScarsUp, CC0 1.0. Test images are AI-modified derivatives of the working copy; the original and edited versions are identified in their captions.
- Tool reference: OpenAI image-generation documentation.