
A blink, a misfiring flash or a jacket covered in lint can spoil an otherwise useful portrait. The problem is the capture, not the person. AI editing can save time on these repairs, but the most convincing result is not always the most faithful one.
We tested four edits on one deliberately imperfect, AI-generated adult office portrait. The before image is a simulated training example, not a photograph of a real employee. All results below were generated with OpenAI’s image-editing tool on November 10, 2026, with one attempt per edit. The workflow recommendations also draw on Adobe’s documentation for masking, removal and background expansion.
The starting image: several problems, one frame
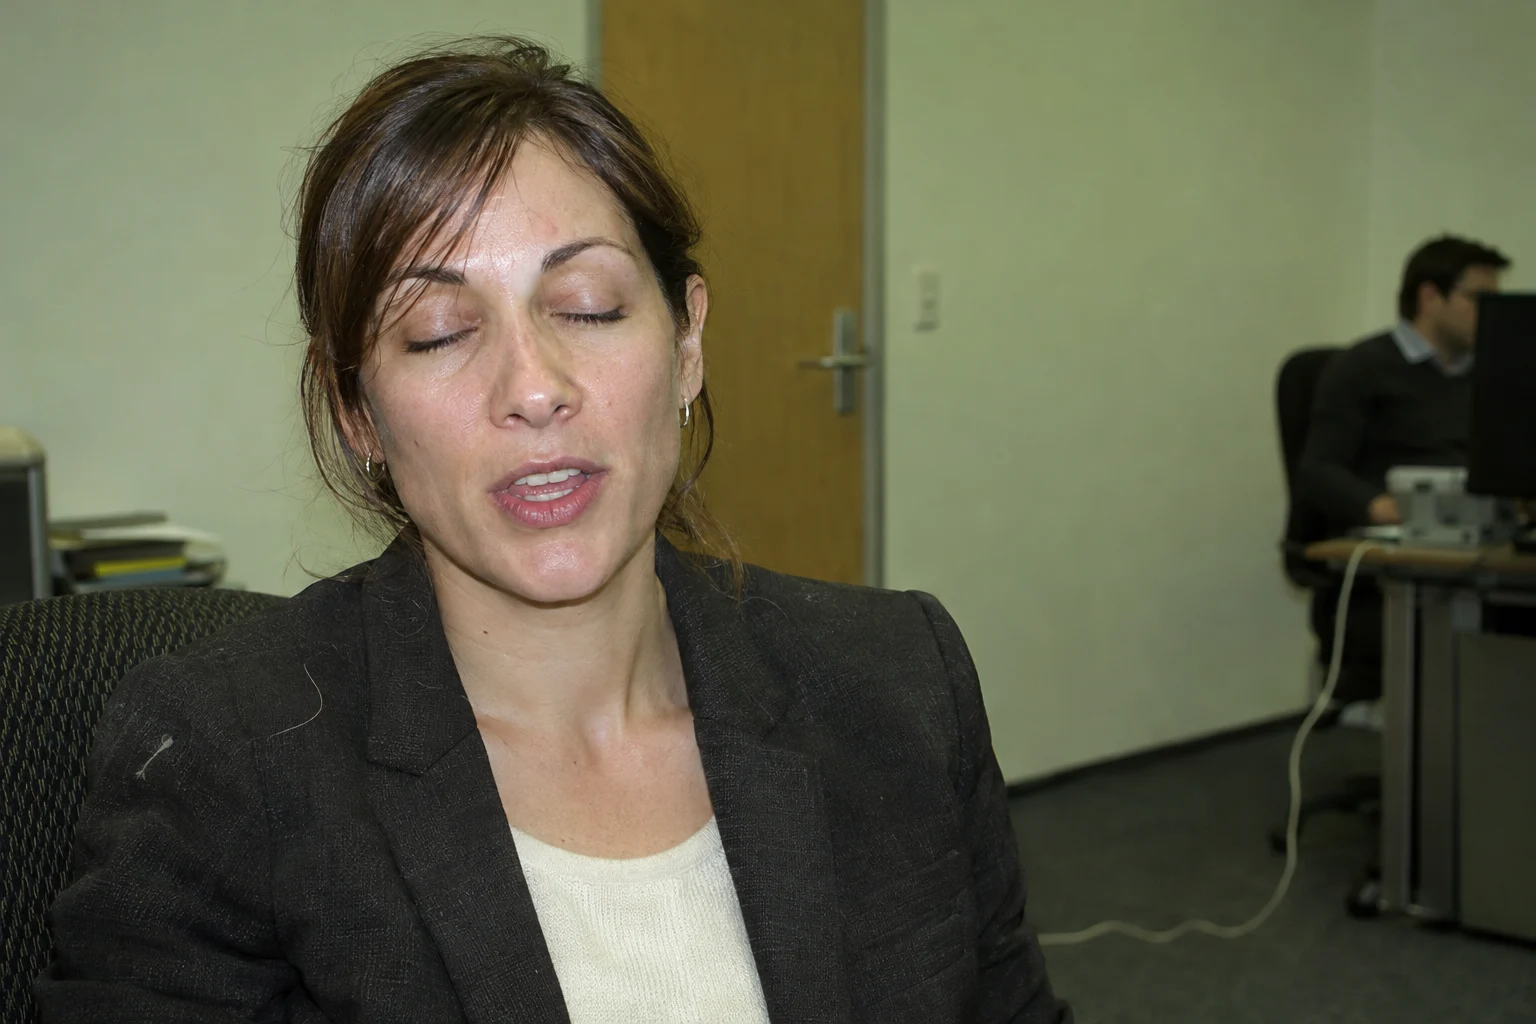
Start by deciding what actually needs changing. A tightly cropped profile photo may only need lint removal and a better crop. A team-page banner may need more background space. A portrait with closed eyes requires a different kind of intervention: generating eyes changes the subject, rather than merely cleaning the photograph.
1. Remove distractions without redesigning the portrait
Small lint spots and loose threads are good candidates for healing or cloning. For a person behind the subject, select the unwanted person and include their shadow or reflection where necessary. Adobe’s Remove tools support distraction removal; a manual selection remains useful when automatic detection misses something.
Our first prompt combined jacket cleanup with removing the background coworker and cable:
Remove only visible lint and loose hairs on the charcoal blazer, retaining its weave, seams, natural folds and shape. Remove the background coworker and trailing cable, reconstructing the existing wall and floor naturally. Keep the foreground woman’s face, CLOSED eyes, parted mouth, hair, pose, skin texture, framing, lighting and color unchanged. No beauty retouching. This is a localized cleanup test; do not improve expression or change background style.
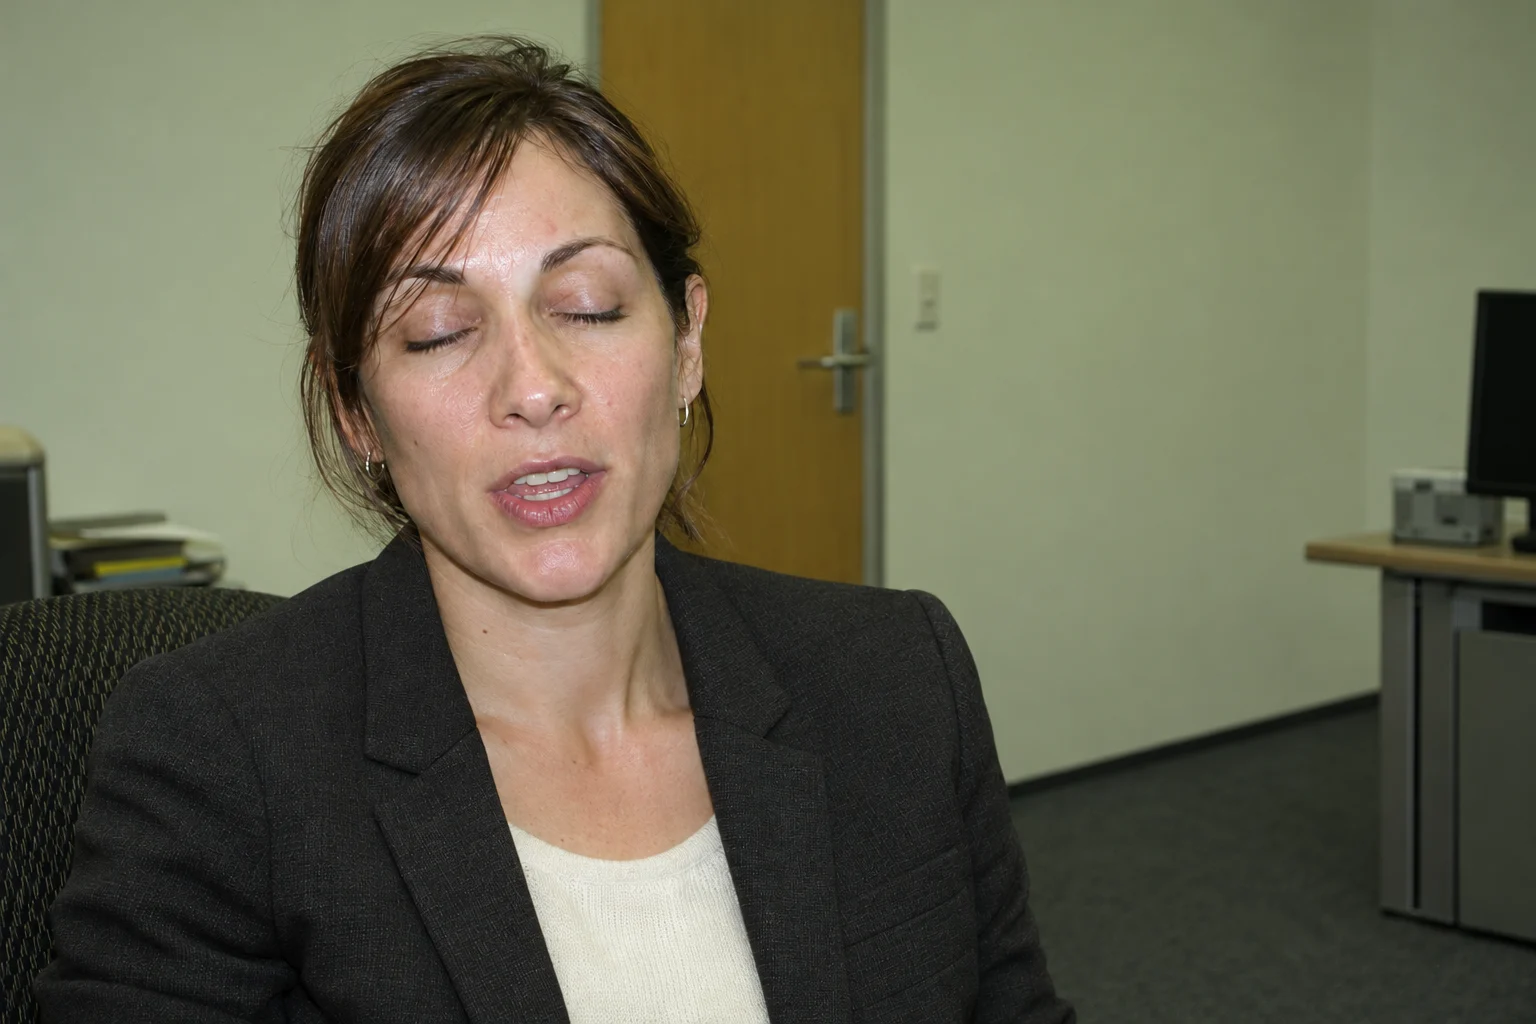
The obvious distractions disappeared, and the office still looked like an office. But the face and clothing were subtly re-rendered. “Keep unchanged” is a request, not a pixel lock. For client work, use a local mask or composite the cleaned background behind the original subject layer.
2. Fix the light before asking for a new face
A white-balance adjustment, exposure correction and a face mask can solve many apparent portrait problems without generative editing. These conventional controls are the better first choice when the expression is already usable.
Correct only the green fluorescent color cast and uneven flash/exposure in this training portrait. Aim for neutral wall and natural skin tone with softer highlights, not lighter skin. Preserve the identical framing, woman’s closed eyes and parted mouth, all facial details and skin texture, hairstyle, jacket lint, background coworker and cable. Do not remove any objects or alter the expression. This is a color-correction-only test, not beauty retouching.

The warmer, more neutral result showed how much lighting alone could improve the frame. It also introduced small texture differences. For a color-only delivery, we would prefer ordinary color adjustments: they do not need to invent facial detail.
3. Center the subject by extending the background
Cropping is the simplest fix when there is enough room. When a banner needs extra space, extend the canvas and generate only the empty area. Photoshop’s Generative Expand is designed for this kind of beyond-the-frame composition.
We tested a prompt-only extension using the cleaned image from Test 1:
Extend the canvas on the LEFT of this cleaned training photograph until the existing woman is centered within a landscape 16:9 composition. Continue the existing office wall and floor naturally. Keep the person the same size relative to the original pixels, with closed eyes, parted mouth, skin texture, hair, pose, jacket and lighting unchanged. Do not redraw or beautify her. Do not add people or objects. This tests background extension, not a new portrait.
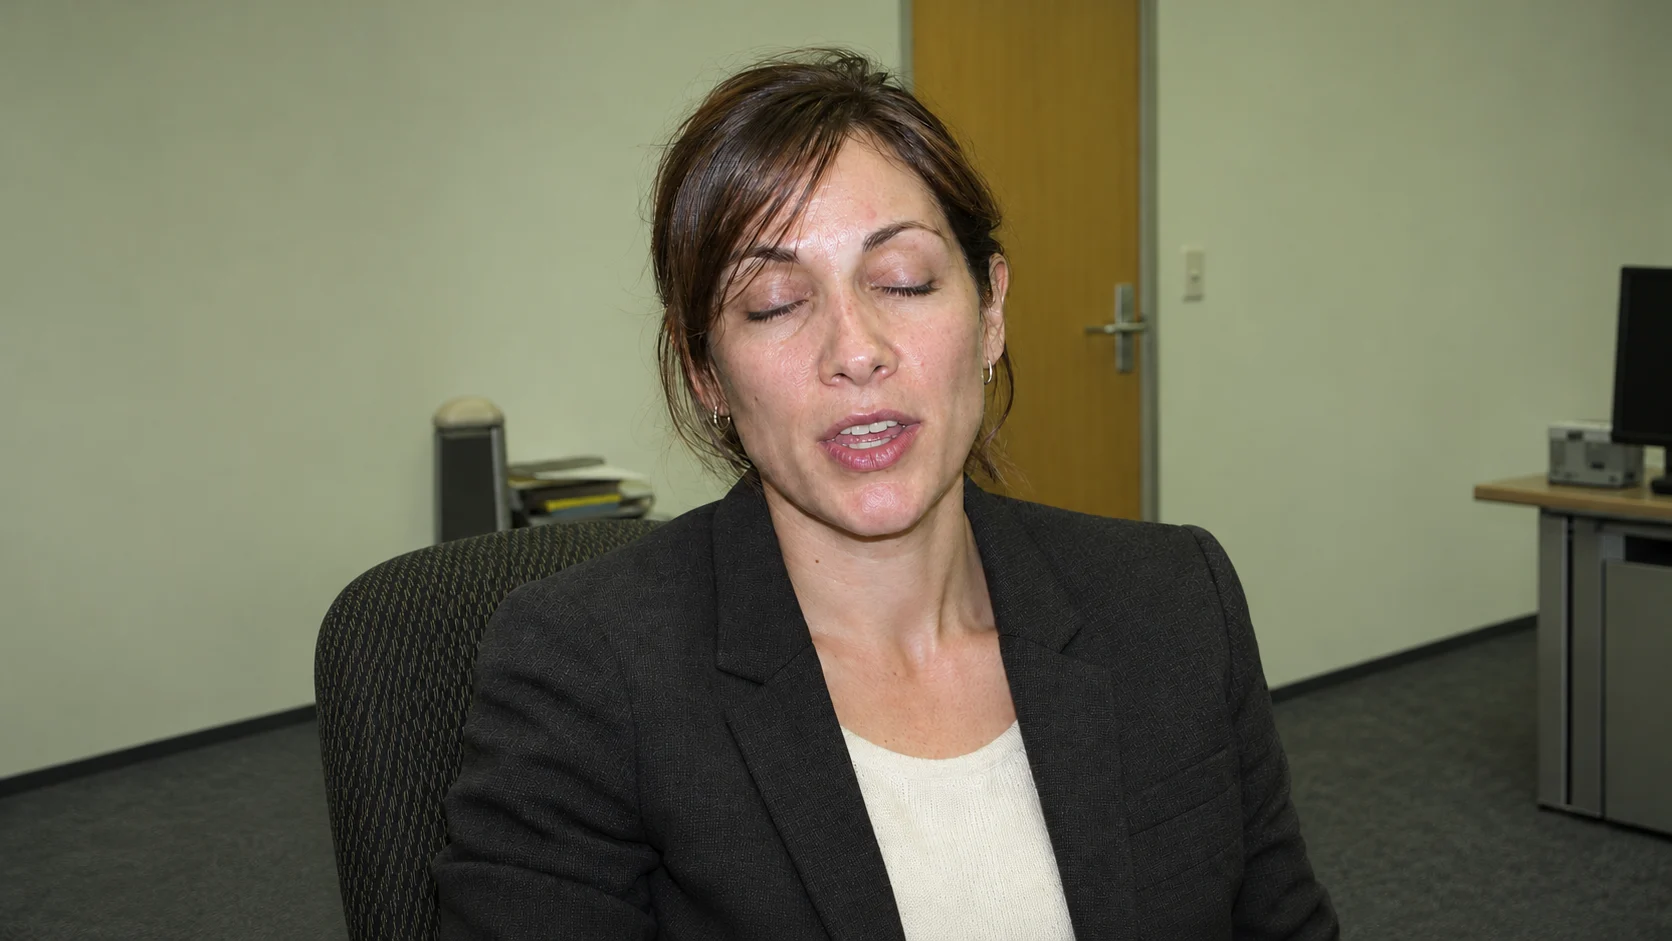
This result worked as a new composition, not as a strict preservation edit. It did not keep the original subject pixels and scale intact. We would reject it for a job whose brief said “change only the background.” A masked expansion with the original portrait on a protected layer is the more controlled workflow.
4. Repair an expression, or create a new interpretation?
For closed eyes, first look for another frame from the same session. Matching the same person’s eyes, head angle and lighting is more reliable than asking a generator to invent them. A slight smile is also an editorial choice: the subject should approve whether it looks like them.
For our final test, we deliberately combined expression, lighting, background and composition into a headshot-style transformation:
Edit this fictional training portrait into a centered professional headshot, retaining the same adult woman and charcoal blazer. Change the expression minimally to open eyes looking at camera and a subtle closed-mouth smile. Preserve facial proportions, apparent age, skin pores, freckles, hairstyle and head angle; no beauty smoothing or slimming. Correct the green cast to neutral natural skin color and soften the harsh flash appearance. Replace office background with softly lit warm-gray studio backdrop, matching perspective and realistic hair edges. Center the subject by recomposing the background; don’t crop the top of the head. Remove lint and loose hairs on jacket but preserve fabric weave and natural folds. Output horizontal 3:2. This is intentionally a combined generative edit test, no text.
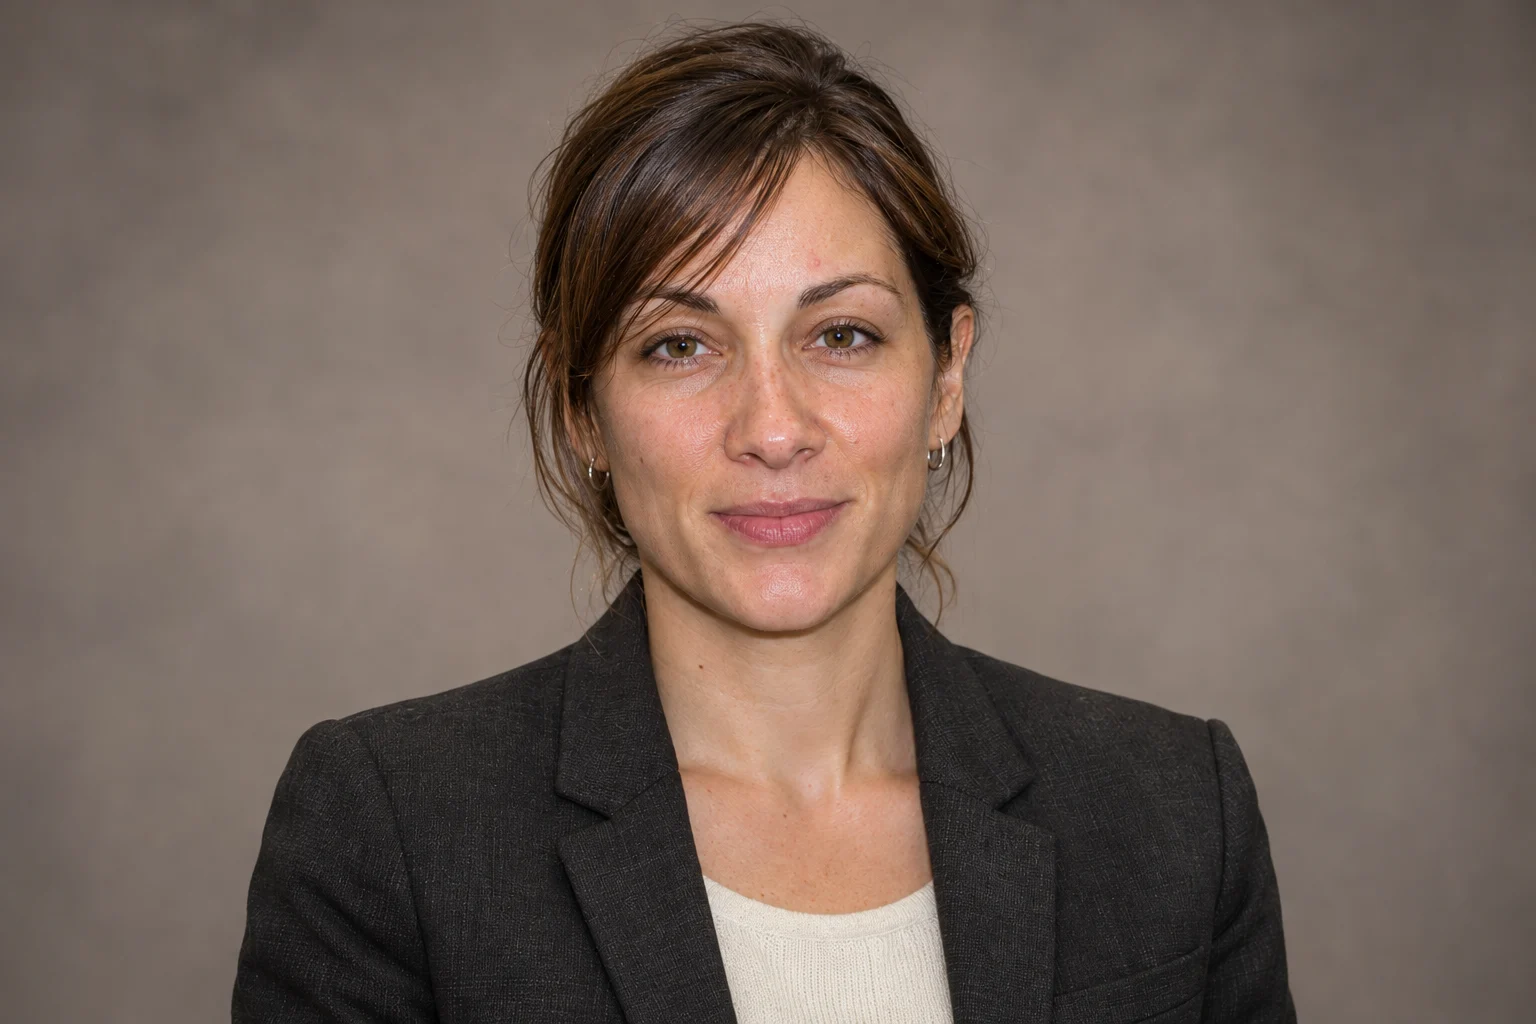
The result is polished and potentially useful as a concept. It also changes eye appearance, facial presentation and pose. Because the source eyes were closed, the open eyes are invented, not recovered. This is the option we would send for explicit likeness approval, not silently substitute for a faithful retouch.
A better workflow for headshots and school-style portraits
- Keep the original. Work from a duplicate and retain the full-resolution source.
- Make ordinary corrections first. Crop, straighten, adjust exposure and white balance, then use local healing for small marks.
- Separate generative tasks. Clean the background, extend it and modify expression as separate versions. This makes unwanted changes easier to spot.
- Use references where identity matters. Another frame of the same person is more useful than a generic request for “better eyes.”
- Compare against the original. Check facial proportions, teeth, hair edges, hands, jewelry, logos and fabric seams at full size.
- Approve the actual output. A successful prompt is not approval of every image it produces.
The same process applies to an adult graduation or school-style portrait. For children’s portraits, use authorized family or school images and the appropriate permissions, rather than collecting examples from public profiles. Public availability does not by itself grant reuse or transformation rights.
A reusable prompt pattern
Change only [specific problem] inside [selected area]. Preserve [identity details, pose, clothing structure, light direction and framing]. Match [reference image or existing background]. Do not change [explicit exclusions]. Output [aspect ratio and intended use].
For wrinkles, ask to reduce distracting creases while retaining seams, garment fit and natural folds. For hair covering an eye, use a reference frame if possible: removing the hair also asks the tool to reconstruct what was hidden. For a background change, specify the light direction and perspective so the person does not look pasted in.
AI is especially useful when removing many small distractions would be slow by hand. Use it where it saves effort, then switch back to precise tools wherever the subject must remain unchanged.