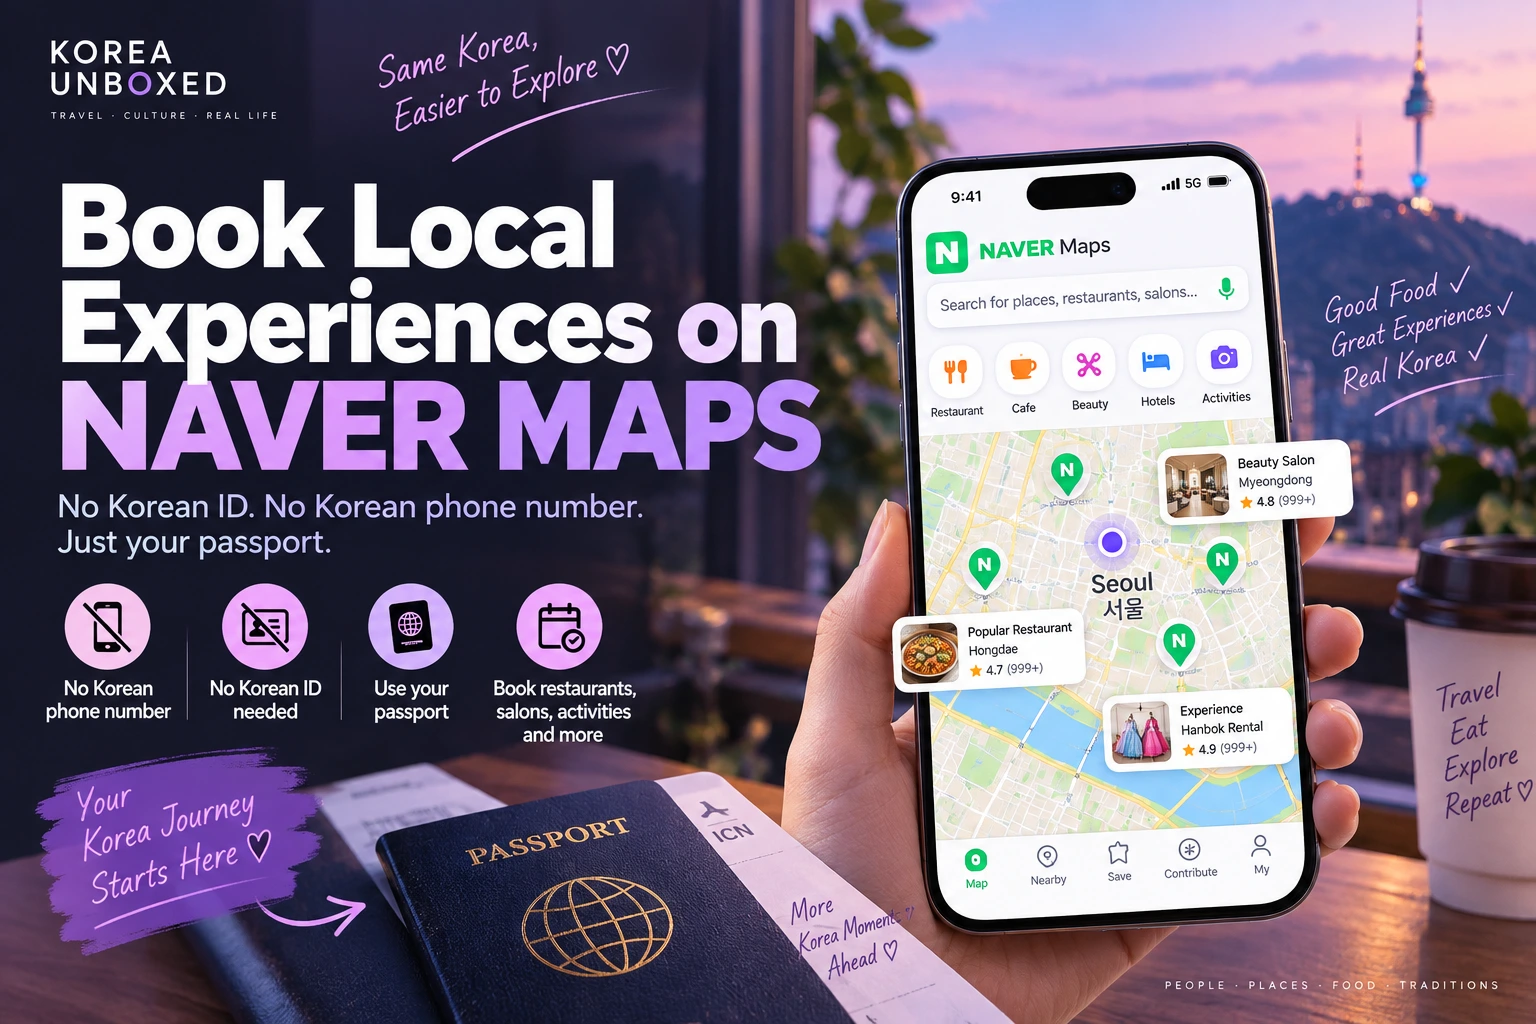
First, what actually changed?
June 2025: NAVER opened more bookings to foreign visitors
NAVER SmartPlace announced that foreign visitors would be able to make supported reservations and orders beginning June 19, 2025.
The changes included:
- overseas-card payment support at participating businesses
- automatic translation of booking information into English, Japanese, and Simplified Chinese
- a business setting that allows merchants to accept or reject bookings and orders from foreign customers
Official source: NAVER SmartPlace foreign booking rollout
June 2026: Passport Verification removed another major barrier
NAVER announced Passport Verification on June 9, 2026, saying the feature had launched on June 4.
Foreign users with passports issued outside South Korea can use Passport Verification with supported NAVER Booking, NAVER Order, and payment services without Korean mobile-phone verification.
Official source: NAVER Passport Verification announcement
What you need before you start
You need a NAVER account.
Official source: How to create an individual NAVER account
For Passport Verification, NAVER says your passport must:
- be issued by a country other than South Korea
- still be valid
- not already have been used to verify another NAVER ID
- show a name and date of birth matching the information registered on your NAVER account
NAVER also requires the original physical passport. You photograph it directly through your phone during verification rather than uploading a saved image.
Official source: Foreign Passport Verification
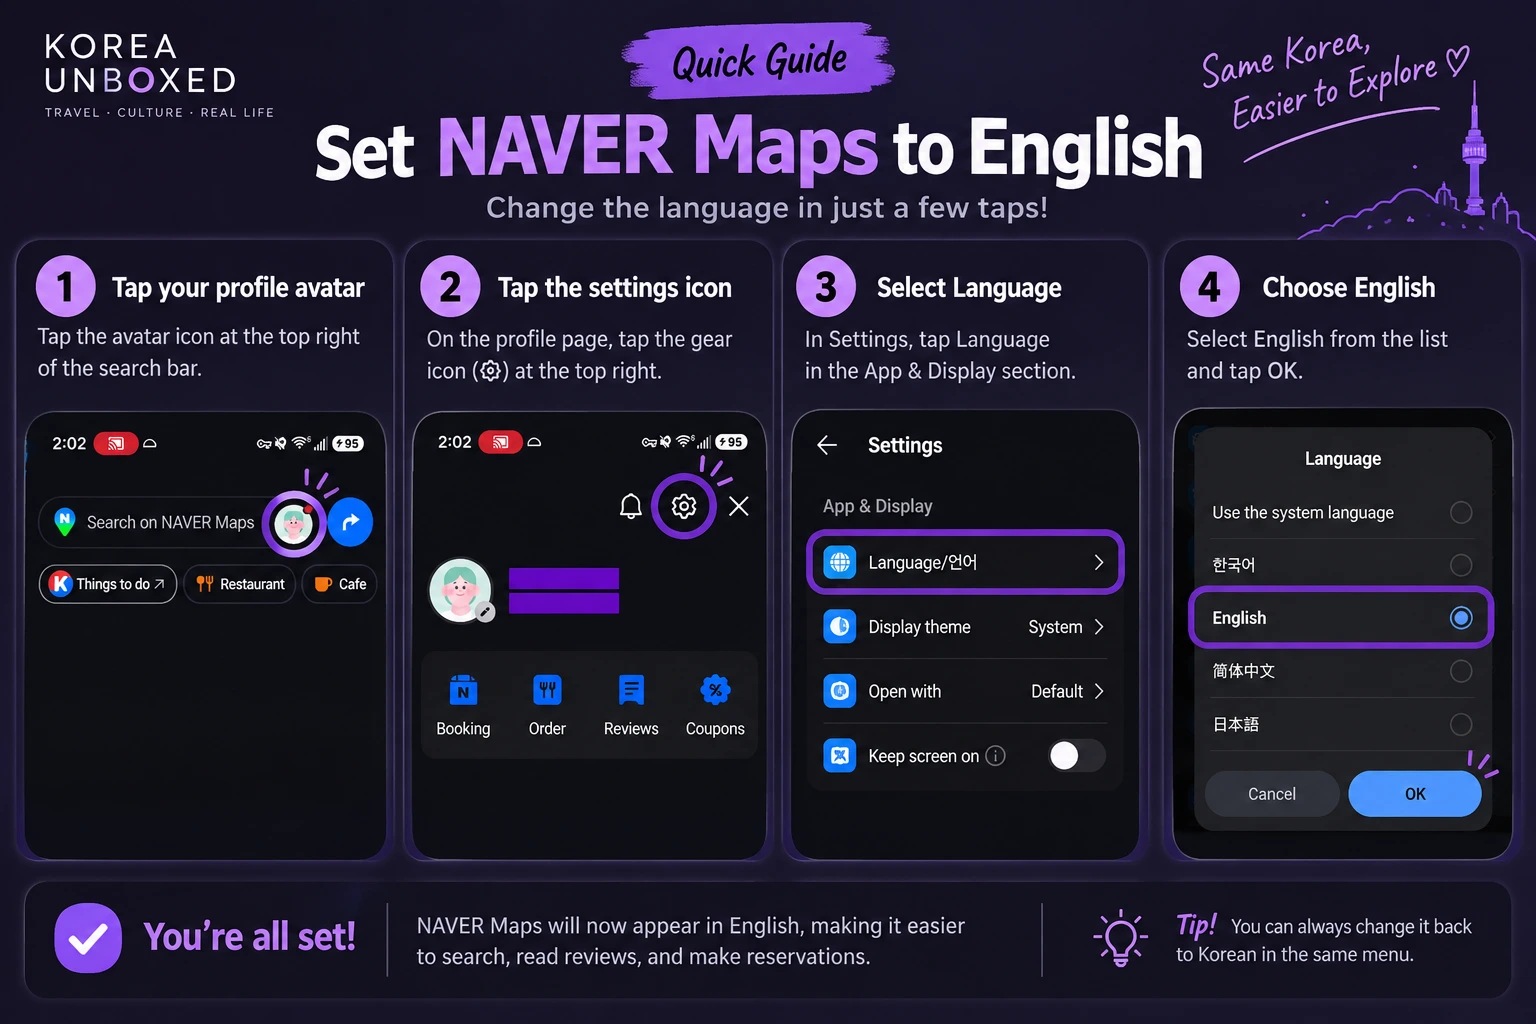
Step 1: Set NAVER Map to English
The exact interface can differ slightly depending on your operating system, app version, and region.
In the U.S. App Store version we tested, there was no permanent MY tab in the bottom navigation.
Instead:
- Open NAVER Map.
- Tap your profile avatar at the top right of the search bar.
- On your account page, tap the gear icon at the top right.
- Scroll to App & Display.
- Tap Language/언어.
- Select English and confirm.
Official source: NAVER Map language settings
Step 2: Open the Booking section
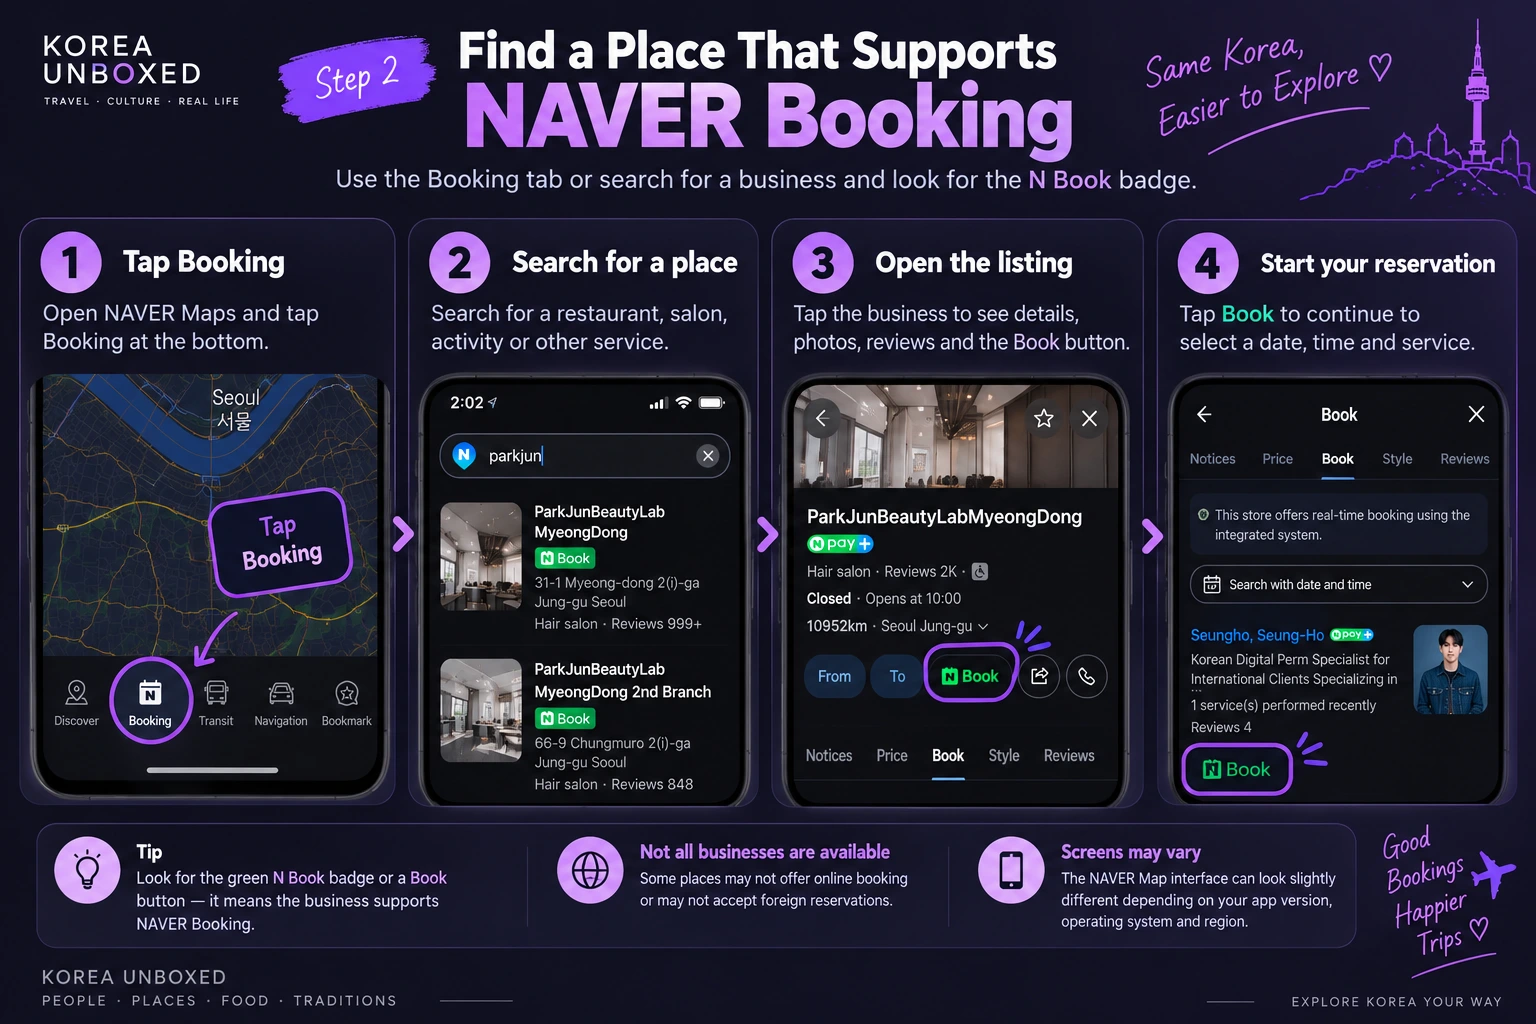
In the version of NAVER Map we tested, Booking appears directly in the bottom navigation.
Tap Booking.
You can then search specifically for places that support NAVER Booking.
When we searched for a salon, the results showed businesses with a small green N Book badge beside the listing.
You can also find bookable businesses through ordinary NAVER search. NAVER’s official instructions say search results may display a Reserve, Book, Order, or Booking link when that business supports NAVER Booking.
Official source: How Users Make Bookings
What to look for
NAVER listing only: You can find the business, but that does not automatically mean NAVER Booking is available.
N Book badge or Book/Reserve button: The business supports NAVER Booking.
No Book button: Do not assume you can make a reservation through NAVER.
Visual guide placement: Booking tab → search result with N Book → business page → Book button.
Suggested title: Find a Place That Supports NAVER Booking
Step 3: Choose what you want to book
Tap the business and then tap Book.
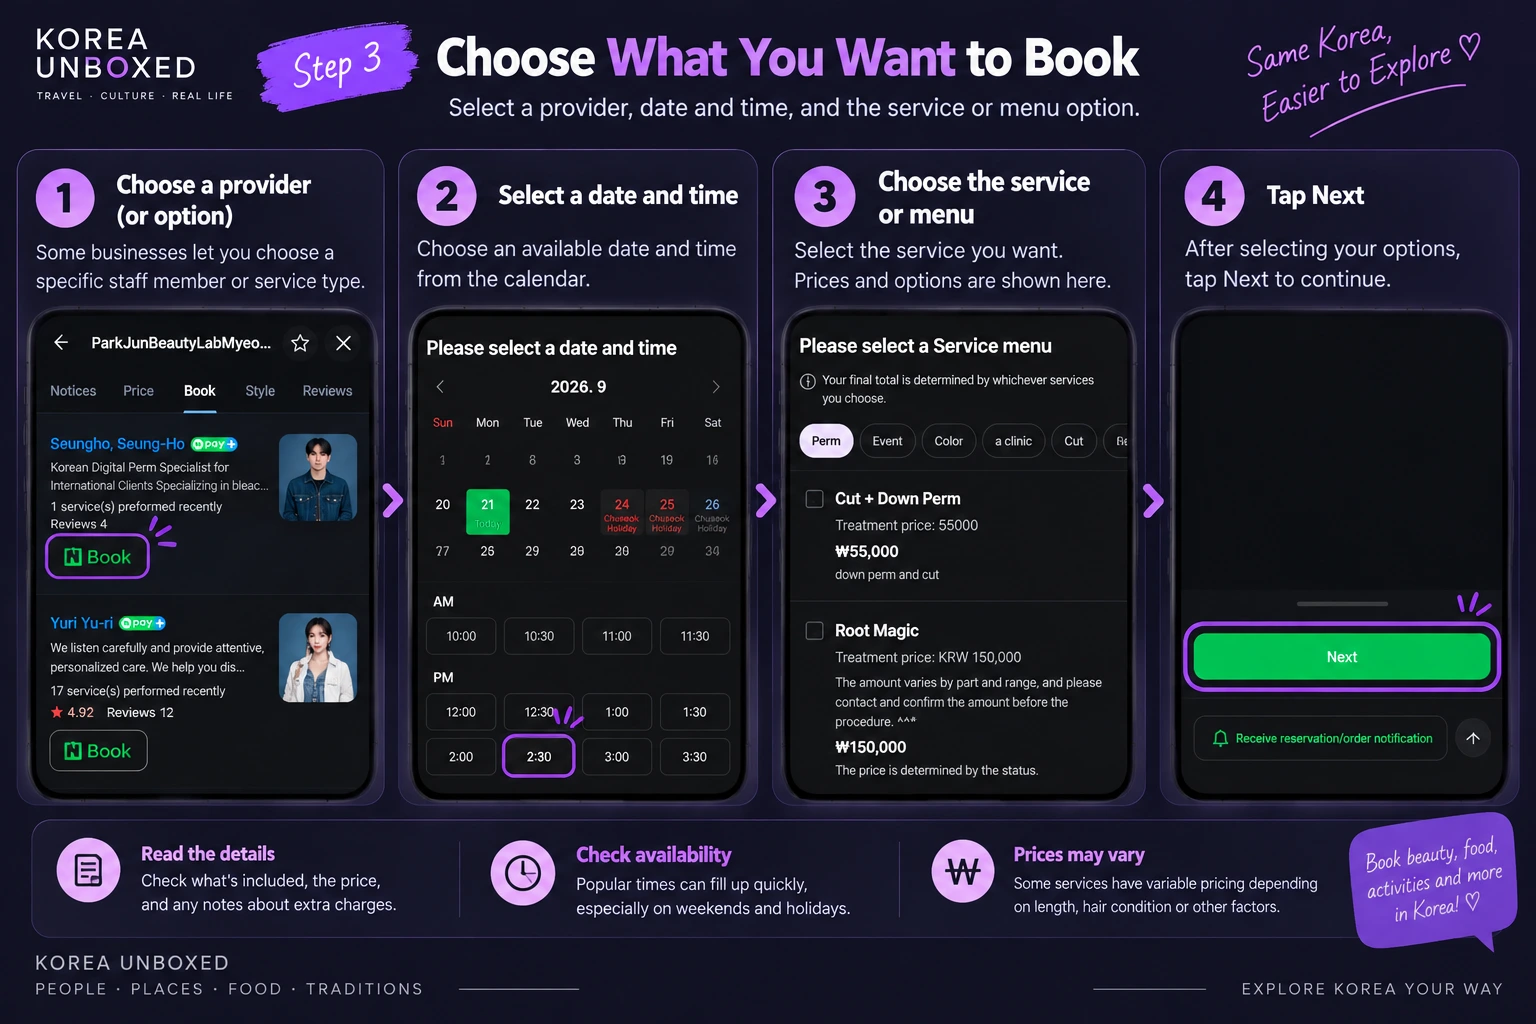
The next screens depend on the type of business. In the salon example we tested, NAVER first showed individual stylists with separate Book buttons.
Other businesses might instead show restaurant reservation types, activities, treatments, admission products, packages, or different service providers.
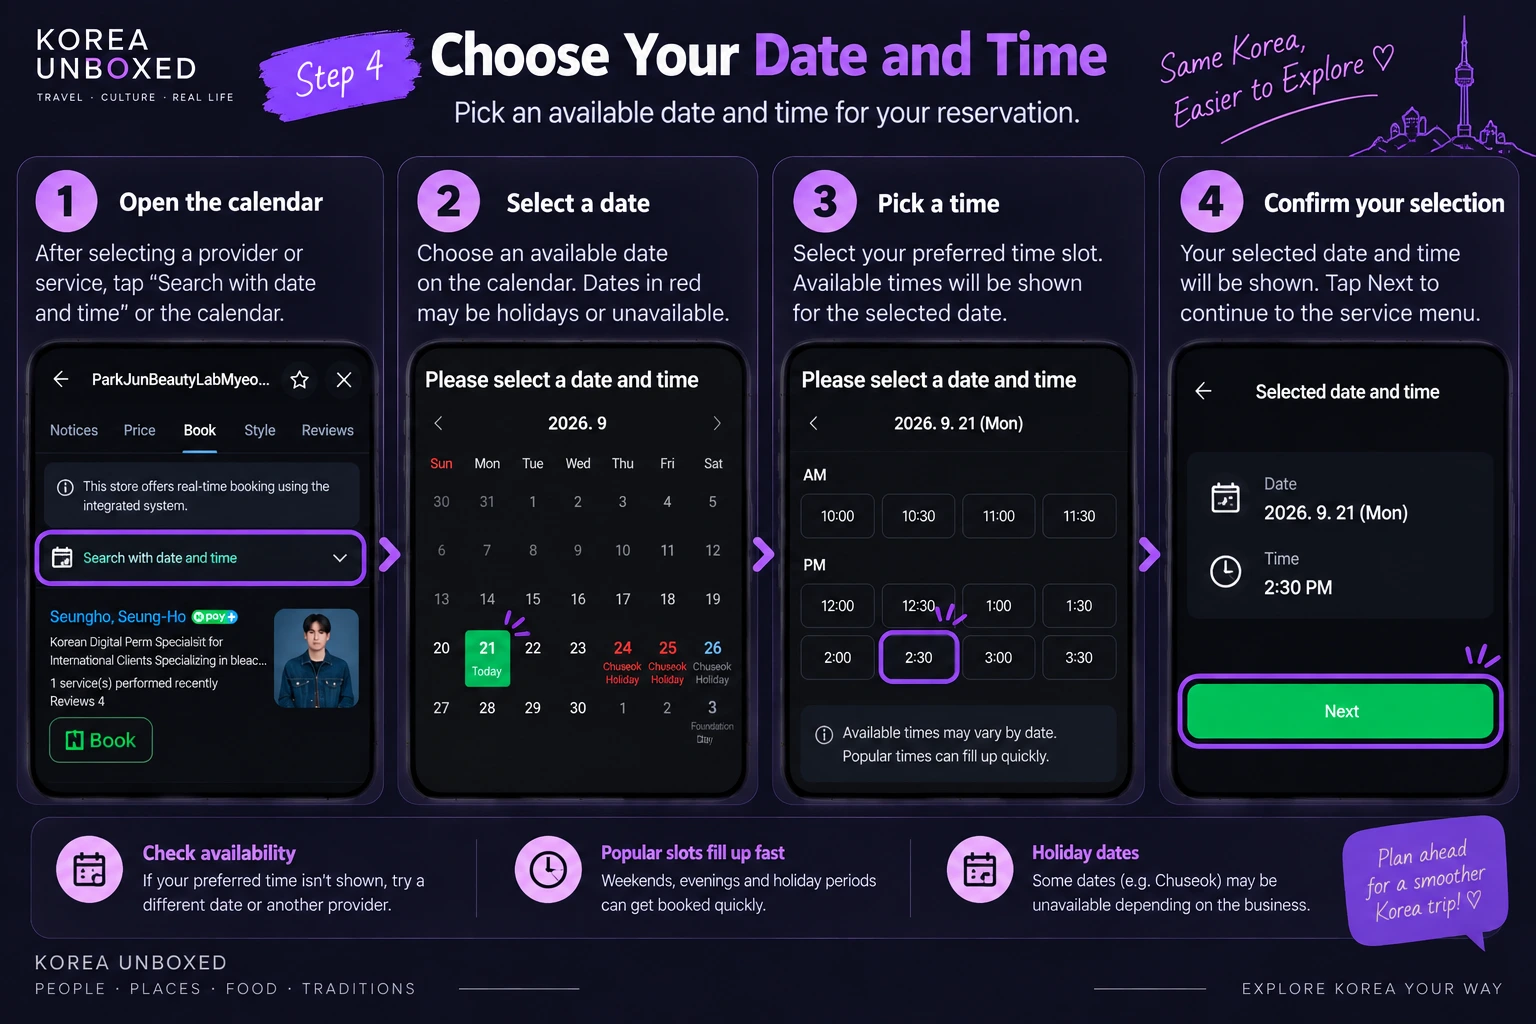
Step 4: Choose your date and time
Once you select the relevant booking option, NAVER displays the available calendar and appointment times.
Choose the correct date → time → party size or provider, where applicable.
Do not assume that selecting a time means you already have a confirmed reservation. Check the booking status after the process is complete.
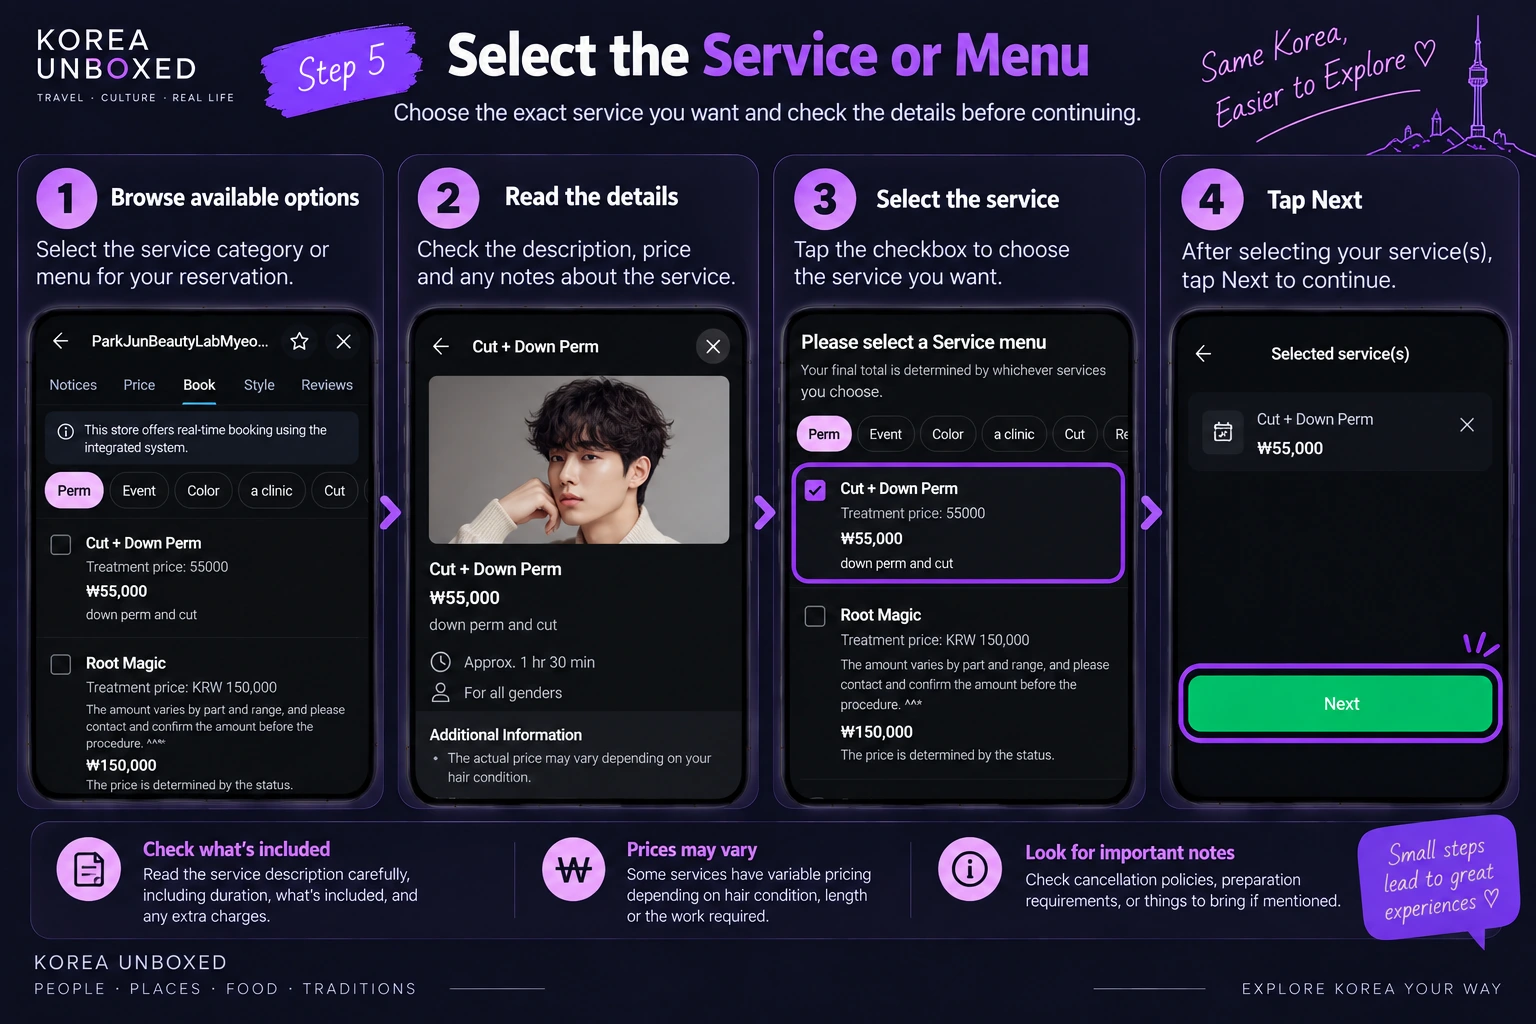
Step 5: Select the service or menu
Some businesses then ask you to choose the exact service.
Our test salon displayed individual treatments with prices and descriptions. Check what is included, the listed price, whether the price can change, cancellation terms, and service duration where shown.
Then tap Next.
Visual guide placement: Provider → date/time → service → Next.
Suggested title: Choose What, When, and Who You’re Booking
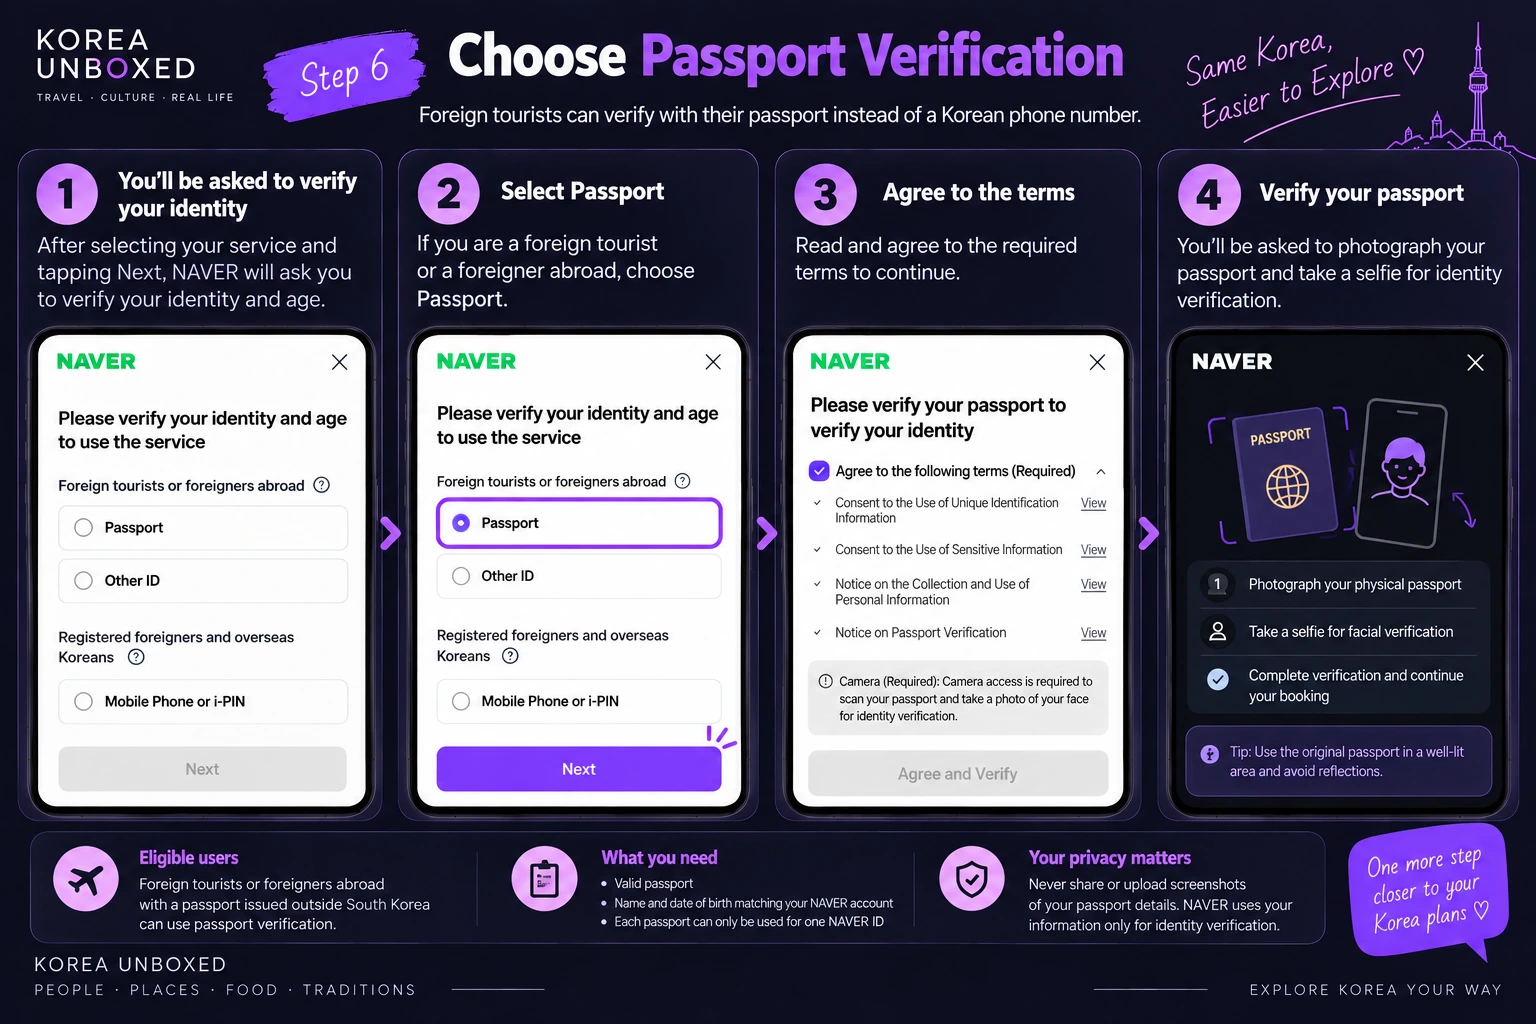
Step 6: Choose Passport Verification
This is the key screen for foreign tourists.
When we continued through the booking flow, NAVER displayed:
“Please verify your identity and age to use the service.”
Under Foreign tourists or foreigners abroad, NAVER offered:
- Passport
- Other ID
Under Registered foreigners and overseas Koreans, NAVER offered:
- Mobile Phone or i-PIN
For a short-term foreign visitor without Korean credentials, choose Passport.
Official source: Foreign Passport Verification
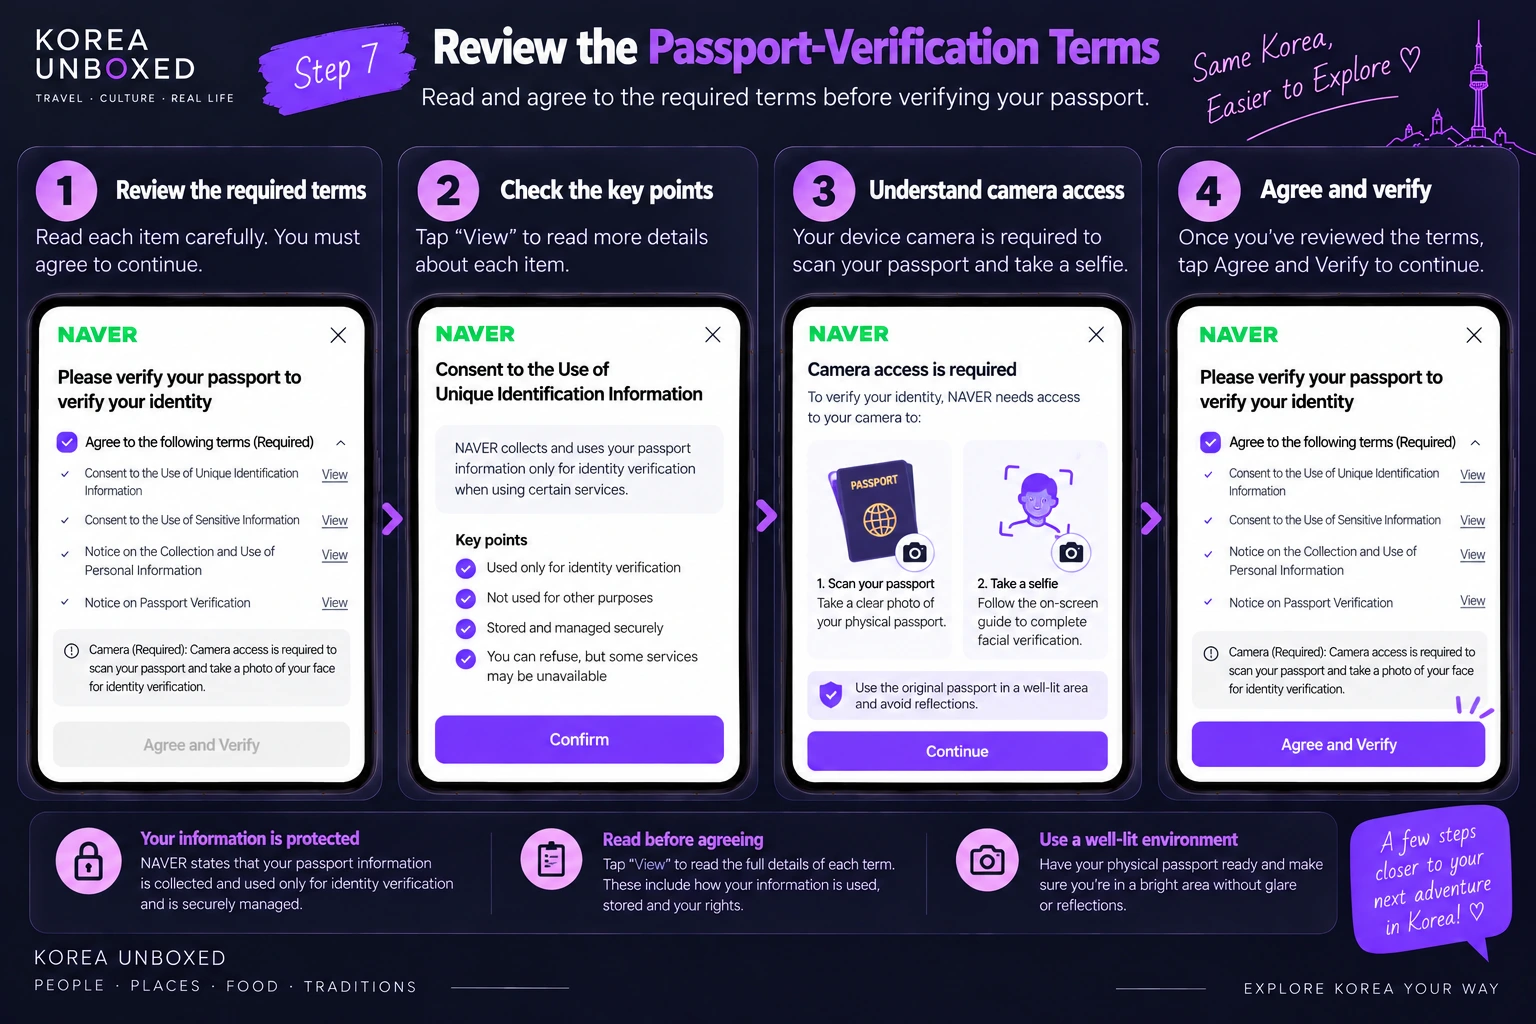
Step 7: Review the passport-verification terms
After choosing Passport, NAVER shows the Passport Verification consent screen.
The screen we reached explained that camera access is required to:
- scan your passport
- photograph your face
- complete identity verification
We stopped our test here.
We did not submit a passport or biometric image.
Never publish a screenshot containing passport numbers, dates of birth, the machine-readable passport zone, document numbers, facial-verification images, or verification identifiers.
What happens after this point?
NAVER’s official documentation explains the remaining process.
Photograph your physical passport
NAVER says to place your passport on a flat surface in a well-lit area and avoid reflections. The passport must be photographed directly through your device camera.
Complete facial verification
NAVER then compares your face with your passport photograph. Face the camera, keep your entire face inside the frame, and follow the movement instructions displayed on screen.
Continue the booking
Once verification succeeds, you return to the supported booking or ordering flow.
Step 8: Pay with an overseas card if required
Some bookings require no advance payment. Others use Npay for a deposit or full payment.
NAVER currently lists these international card networks as supported for the foreign-card registration route:
Visa, Mastercard, UnionPay, American Express, JCB, and Discover.
Official source: Supported overseas cards
Foreign members using Npay for NAVER Booking currently have a monthly payment limit of ₩5,000,000.
Official source: Payment limit for foreign members
Step 9: Check that the booking is confirmed
NAVER stores ordinary booking history in MY Place.
Search for NAVER MY Place or 마이플레이스, then open Bookings.
You can view upcoming, previous, and cancelled bookings.
Official source: How to Check Booking History
If you see Mark as Used (For Staff), do not press it yourself. It is intended for venue staff.
What if you need to change the reservation?
Unpaid bookings can sometimes be changed directly if another slot is available.
Bookings paid through Npay, or scheduled for Npay payment after the visit, generally need to be cancelled and booked again.
Official source: How to Change a Booking
For cancellations:
Official source: How to Cancel a Booking
Can you book for somebody else?
NAVER allows visitor information to be added for another person or group in supported bookings.
Official source: How to Enter Visitor Information
Bookings are generally tied to the booking holder, although individual businesses may allow another visitor after checking the reservation details.
Official source: Using a Booking for Someone Else
What can still stop a foreign visitor from booking?
Passport Verification does not unlock every NAVER feature.
A reservation can still fail because:
- the business does not use NAVER Booking
- the business has disabled foreign bookings
- the service or time is sold out
- your passport is expired
- that passport has already verified another NAVER ID
- your NAVER name or birth date does not match your passport
- your card network is unsupported
- your bank rejects payment authentication
- the service is restricted to Npay Korea Members
Some Npay services still require Korea Member status.
Official source: Npay Korea Member restrictions
The correct takeaway is not “A passport unlocks every NAVER feature.”
It is:
“Passport Verification can replace Korean mobile identity verification in supported Booking, Order, and payment flows.”
Bonus: NAVER Map has a Things to do section for foreign tourists
Foreign visitors may also see a Things to do shortcut inside NAVER Map’s Booking area.
Official source: Things to do in NAVER Map
Why this matters
NAVER Map has long been one of the most useful tools for finding places in Korea.
For foreign tourists, the gap between finding a place and actually reserving it is now much smaller.
A supported booking can look like:
Find the business → tap Book → choose the service → select a date and time → verify with your passport → pay if necessary → confirm the reservation
No Korean resident registration number.
No Korean bank account simply to make an ordinary reservation.
And, in supported Passport Verification flows, no Korean phone number for identity verification.
That means the next time you find exactly what you want on NAVER Map, the Book button is worth trying.
Last fact-checked: September 20, 2026. NAVER interfaces vary by operating system, app version, account type, and region. Businesses control their own reservation availability, foreign-customer settings, payment requirements, and cancellation policies.
Official sources
- NAVER Passport Verification announcement
- Foreign Passport Verification Help
- NAVER SmartPlace foreign booking rollout
- How Users Make Bookings
- NAVER Map language settings
- Supported overseas cards
- How to Check Booking History
- How to Change a Booking
- How to Cancel a Booking
- Things to do in NAVER Map